Instructions for Use
DND Electronic Phonendoscope
Page text
Diagnostika na Domu LLP
(ТОО «Диагностика на Дому»)
INSTRUCTIONS FOR USE
Electronic Phonendoscope
TU 7500 RK 11739547 TOO-001-2023
English translation of the Russian-language original dated 07.10.2026. In case of any discrepancy, the
Russian version prevails. Screenshots show the Russian-language interface of the app.
Page text
Contents
1. General information............................................................................................3
Device name.........................................................................................................3
Intended purpose.................................................................................................. 3
Field of application.............................................................................................. 3
Contraindications.................................................................................................3
Possible side effects.............................................................................................4
Intended users.......................................................................................................4
2. Device description, principle of operation and specifications.........................4
3. Cleaning and disinfection..................................................................................28
4. Disposal...............................................................................................................28
5. Symbols used on the device, its components and packaging.........................28
6. Transport and storage conditions....................................................................29
7. Service life and shelf life....................................................................................29
8. Warranty............................................................................................................29
9. Complaints..........................................................................................................29
10. Applicable standards....................................................................................... 30
2
Page text
1. General information
Device name
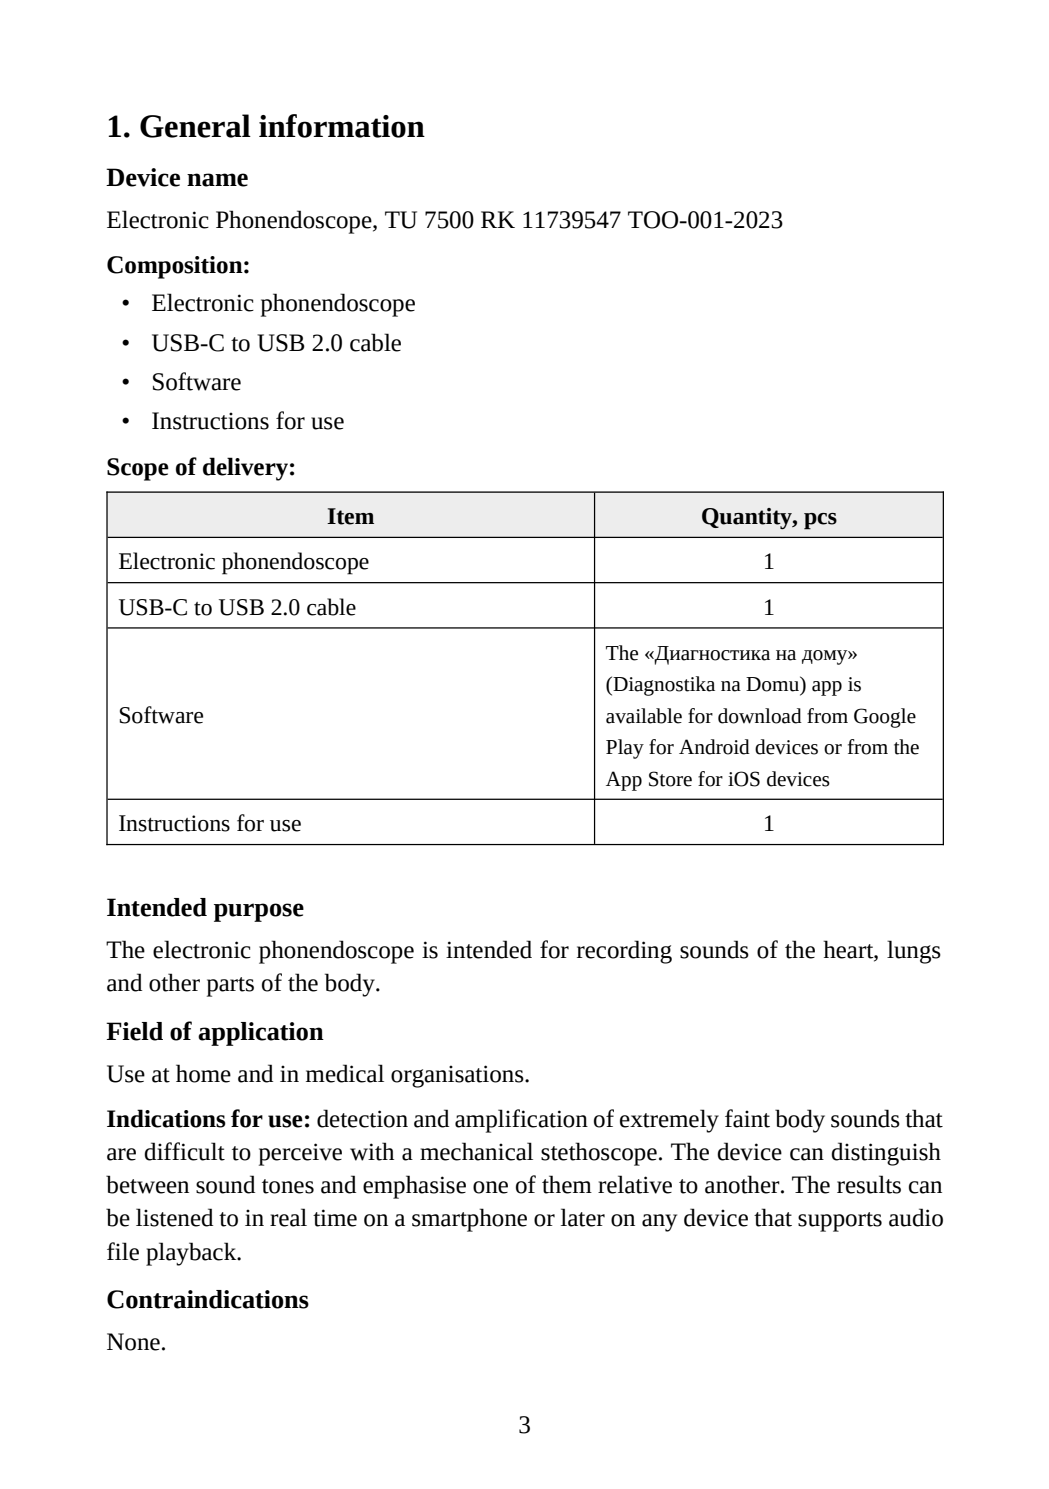
Electronic Phonendoscope, TU 7500 RK 11739547 TOO-001-2023
Composition:
• Electronic phonendoscope
• USB-C to USB 2.0 cable
• Software
• Instructions for use
Scope of delivery:
Item Quantity, pcs
Electronic phonendoscope 1
USB-C to USB 2.0 cable 1
Software
The «Диагностика на дому»
(Diagnostika na Domu) app is
available for download from Google
Play for Android devices or from the
App Store for iOS devices
Instructions for use 1
Intended purpose
The electronic phonendoscope is intended for recording sounds of the heart, lungs
and other parts of the body.
Field of application
Use at home and in medical organisations.
Indications for use: detection and amplification of extremely faint body sounds that
are difficult to perceive with a mechanical stethoscope. The device can distinguish
between sound tones and emphasise one of them relative to another. The results can
be listened to in real time on a smartphone or later on any device that supports audio
file playback.
Contraindications
None.
3
Page text
Possible side effects
Individual intolerance to the device materials; re-infection or cross-infection.
Intended users
The device is used by individual consumers at home and by specialists in medical
organisations.
Precautions:
• Read these instructions before using the phonendoscope!
• Avoid storage in very hot, cold or humid conditions.
• In the event of a malfunction, contact the manufacturer or the manufacturer's
authorised representative.
2. Device description, principle of operation and
specifications
By its principle of operation, the phonendoscope is an acoustic device (without
energy conversion) for listening to natural sounds associated with the activity of
human internal organs and for transmitting the sound vibrations by means of
dedicated software used to record auscultation data and send it to a doctor. The
phonendoscope is made of materials and substances that do not contain medicinal
products for medical use or materials of animal or human origin.
Schematic information on the principle of use
Instructions for using the phonendoscope:
Step 1 (before first use)
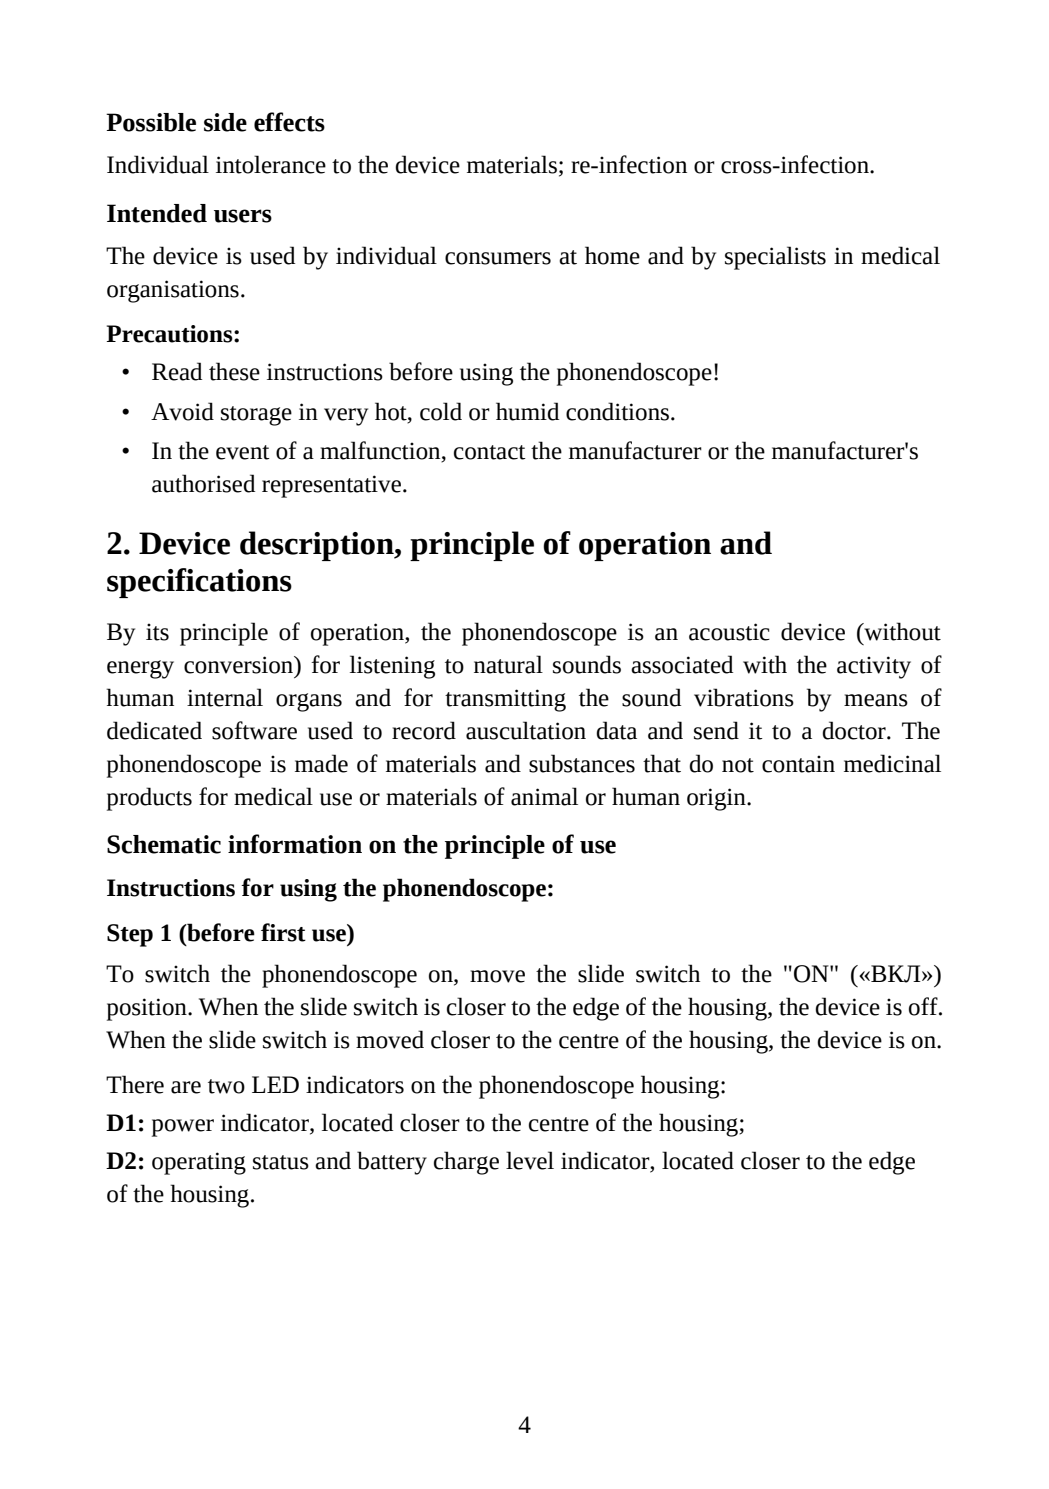
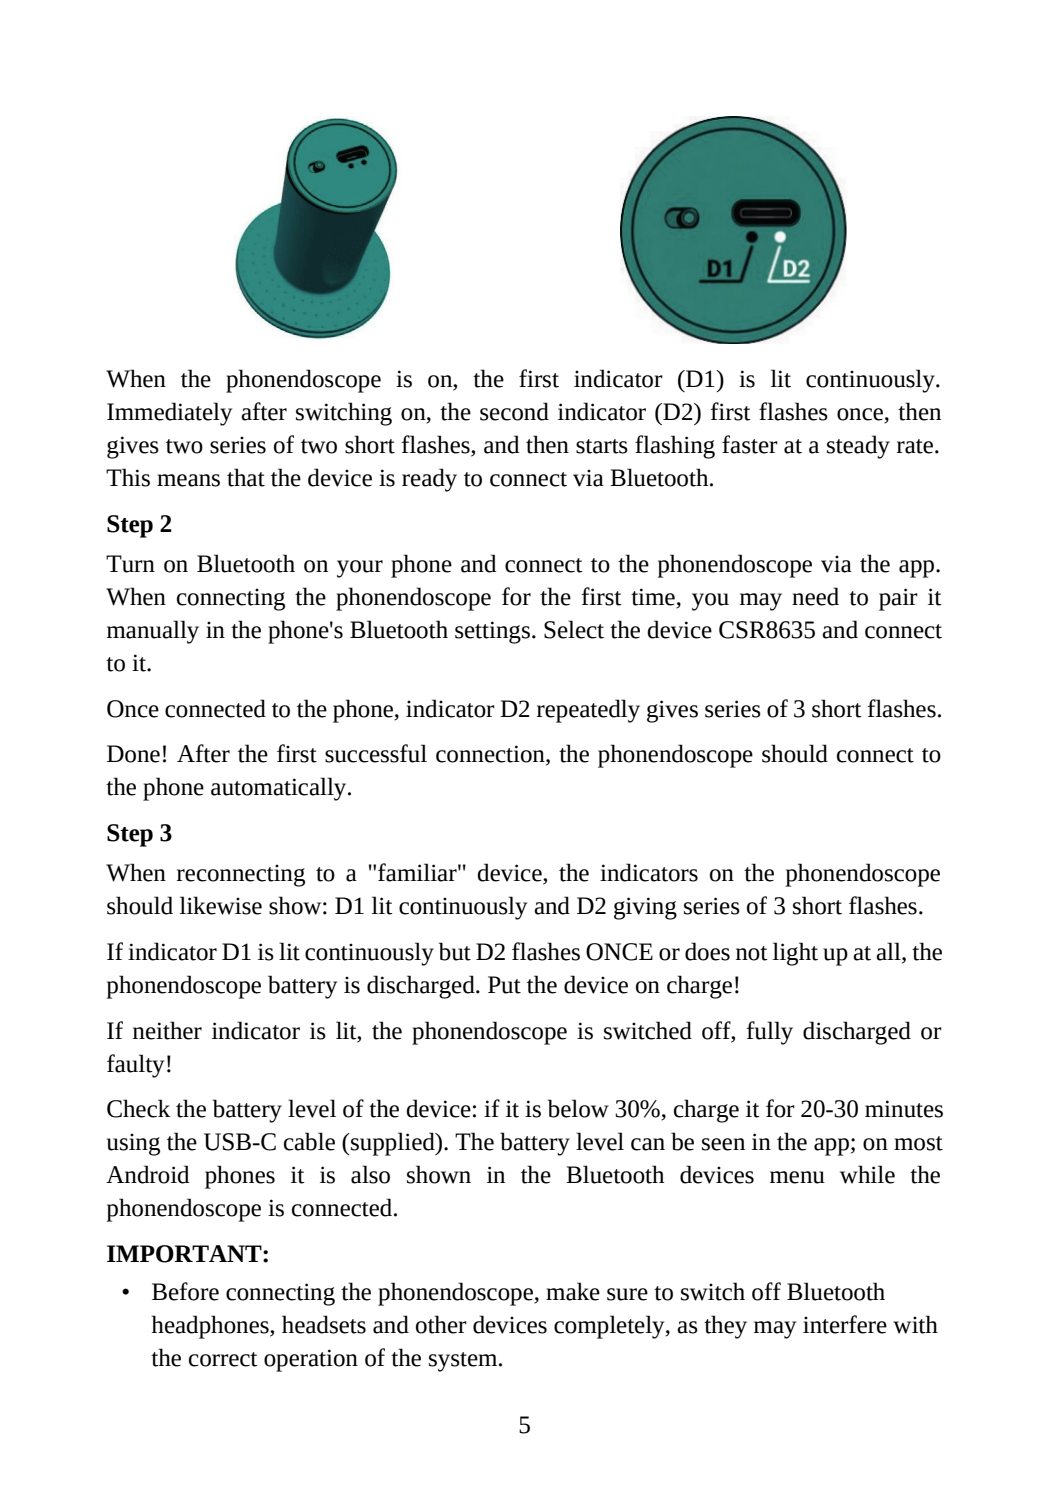
To switch the phonendoscope on, move the slide switch to the "ON" («ВКЛ»)
position. When the slide switch is closer to the edge of the housing, the device is off.
When the slide switch is moved closer to the centre of the housing, the device is on.
There are two LED indicators on the phonendoscope housing:
D1: power indicator, located closer to the centre of the housing;
D2: operating status and battery charge level indicator, located closer to the edge
of the housing.
4
Page text
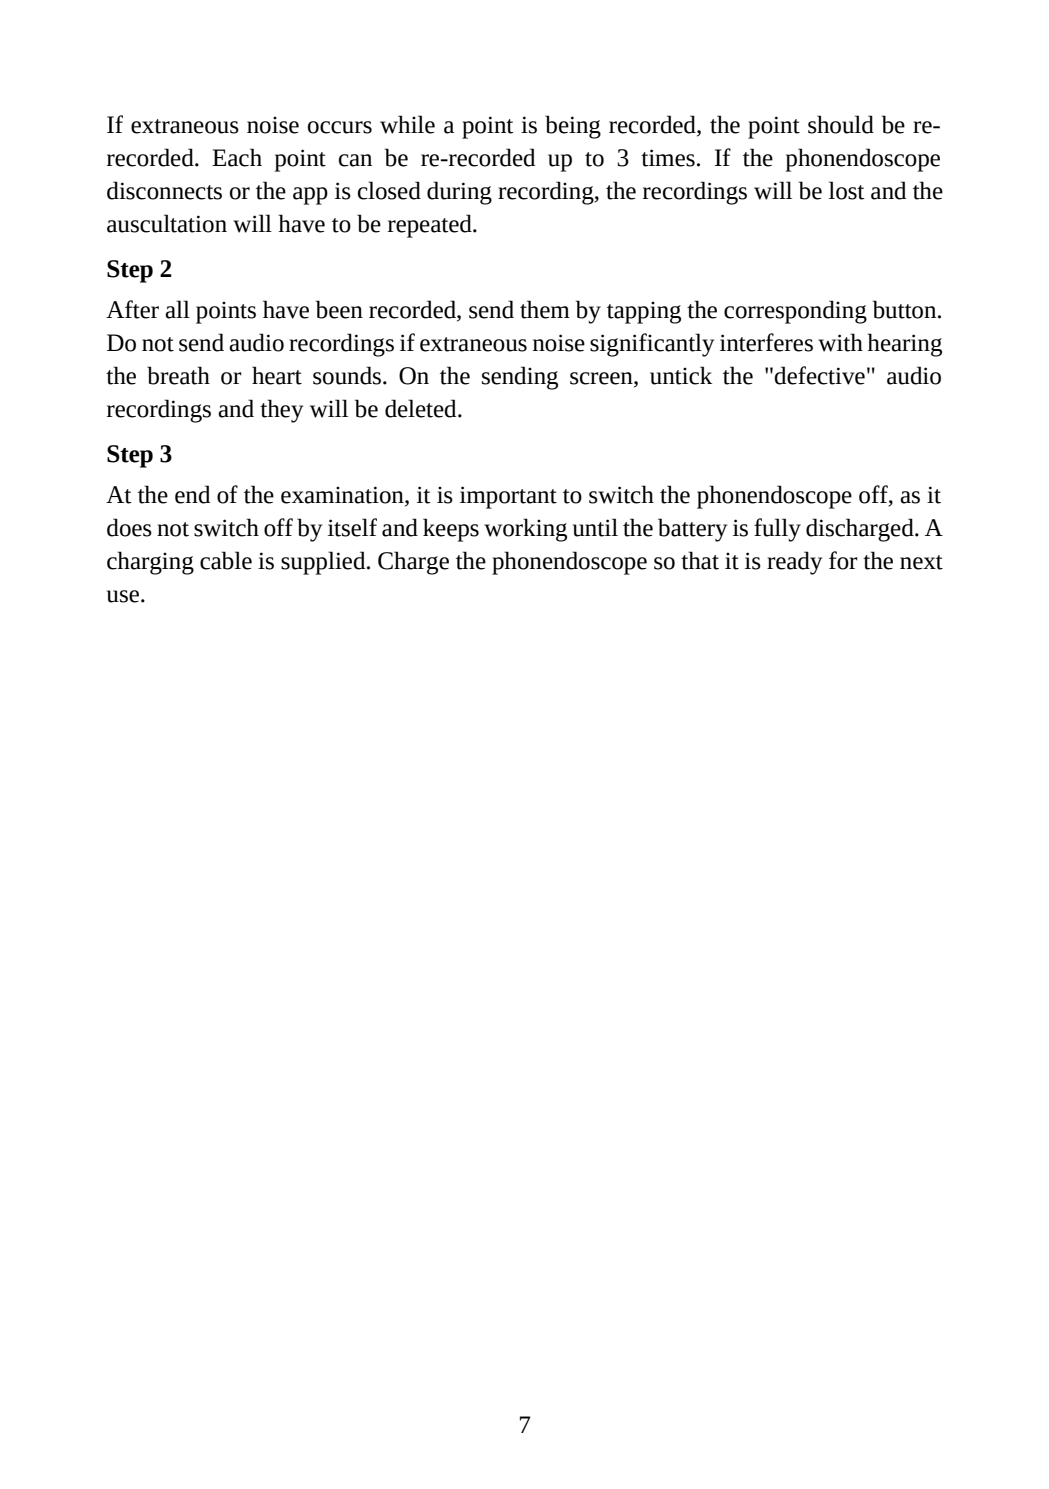
When the phonendoscope is on, the first indicator (D1) is lit continuously.
Immediately after switching on, the second indicator (D2) first flashes once, then
gives two series of two short flashes, and then starts flashing faster at a steady rate.
This means that the device is ready to connect via Bluetooth.
Step 2
Turn on Bluetooth on your phone and connect to the phonendoscope via the app.
When connecting the phonendoscope for the first time, you may need to pair it
manually in the phone's Bluetooth settings. Select the device CSR8635 and connect
to it.
Once connected to the phone, indicator D2 repeatedly gives series of 3 short flashes.
Done! After the first successful connection, the phonendoscope should connect to
the phone automatically.
Step 3
When reconnecting to a "familiar" device, the indicators on the phonendoscope
should likewise show: D1 lit continuously and D2 giving series of 3 short flashes.
If indicator D1 is lit continuously but D2 flashes ONCE or does not light up at all, the
phonendoscope battery is discharged. Put the device on charge!
If neither indicator is lit, the phonendoscope is switched off, fully discharged or
faulty!
Check the battery level of the device: if it is below 30%, charge it for 20-30 minutes
using the USB-C cable (supplied). The battery level can be seen in the app; on most
Android phones it is also shown in the Bluetooth devices menu while the
phonendoscope is connected.
IMPORTANT:
• Before connecting the phonendoscope, make sure to switch off Bluetooth
headphones, headsets and other devices completely, as they may interfere with
the correct operation of the system.
5
Page text
• If you want to connect the phonendoscope to another phone nearby, be sure to
switch off Bluetooth on your own phone. The phonendoscope must then be
switched off and on again. You may also need to "forget", i.e. remove, the
phonendoscope (CSR8635) from the list of Bluetooth devices on your phone
in order to connect it to another phone.
• It is recommended to charge the device when the battery level is below 30%.
• In cold conditions, the phonendoscope battery may discharge spontaneously.
• Put the device on charge and wait until it has warmed up to room temperature.
D1 lit continuously; D2 flashes once, then
gives two series of two short flashes, then
flashes rapidly at a steady rate
Device is ready to connect via
Bluetooth
D1 lit continuously; D2 repeatedly gives
series of 3 short flashes Device is connected
D1 lit continuously; D2 flashes once or is
off Battery is discharged
D1 off; D2 off Device is switched off, fully
discharged or faulty
Performing auscultation
Step 1
To perform auscultation, follow the instructions on the phone and place the
phonendoscope on the points shown on the diagram (see "Using the app").
While recording each point, observe the following simple rules:
• Perform auscultation on bare skin
• Start recording only after placing the phonendoscope on the required point
• Press the phonendoscope firmly and do not move it during recording
• Do not talk and avoid loud noises
• Try to carry out the examination in a quiet room
When listening to the heart, hold your breath or breathe shallowly and try to avoid
extraneous sounds; this is important so that the heart sounds can be heard.
When listening to the lungs, take several normal breaths in and out, and several deep
breaths in and out through the mouth.
6
Page text
If extraneous noise occurs while a point is being recorded, the point should be rerecorded. Each point can be re-recorded up to 3 times. If the phonendoscope
disconnects or the app is closed during recording, the recordings will be lost and the
auscultation will have to be repeated.
Step 2
After all points have been recorded, send them by tapping the corresponding button.
Do not send audio recordings if extraneous noise significantly interferes with hearing
the breath or heart sounds. On the sending screen, untick the "defective" audio
recordings and they will be deleted.
Step 3
At the end of the examination, it is important to switch the phonendoscope off, as it
does not switch off by itself and keeps working until the battery is fully discharged. A
charging cable is supplied. Charge the phonendoscope so that it is ready for the next
use.
7
Page text
Using the app
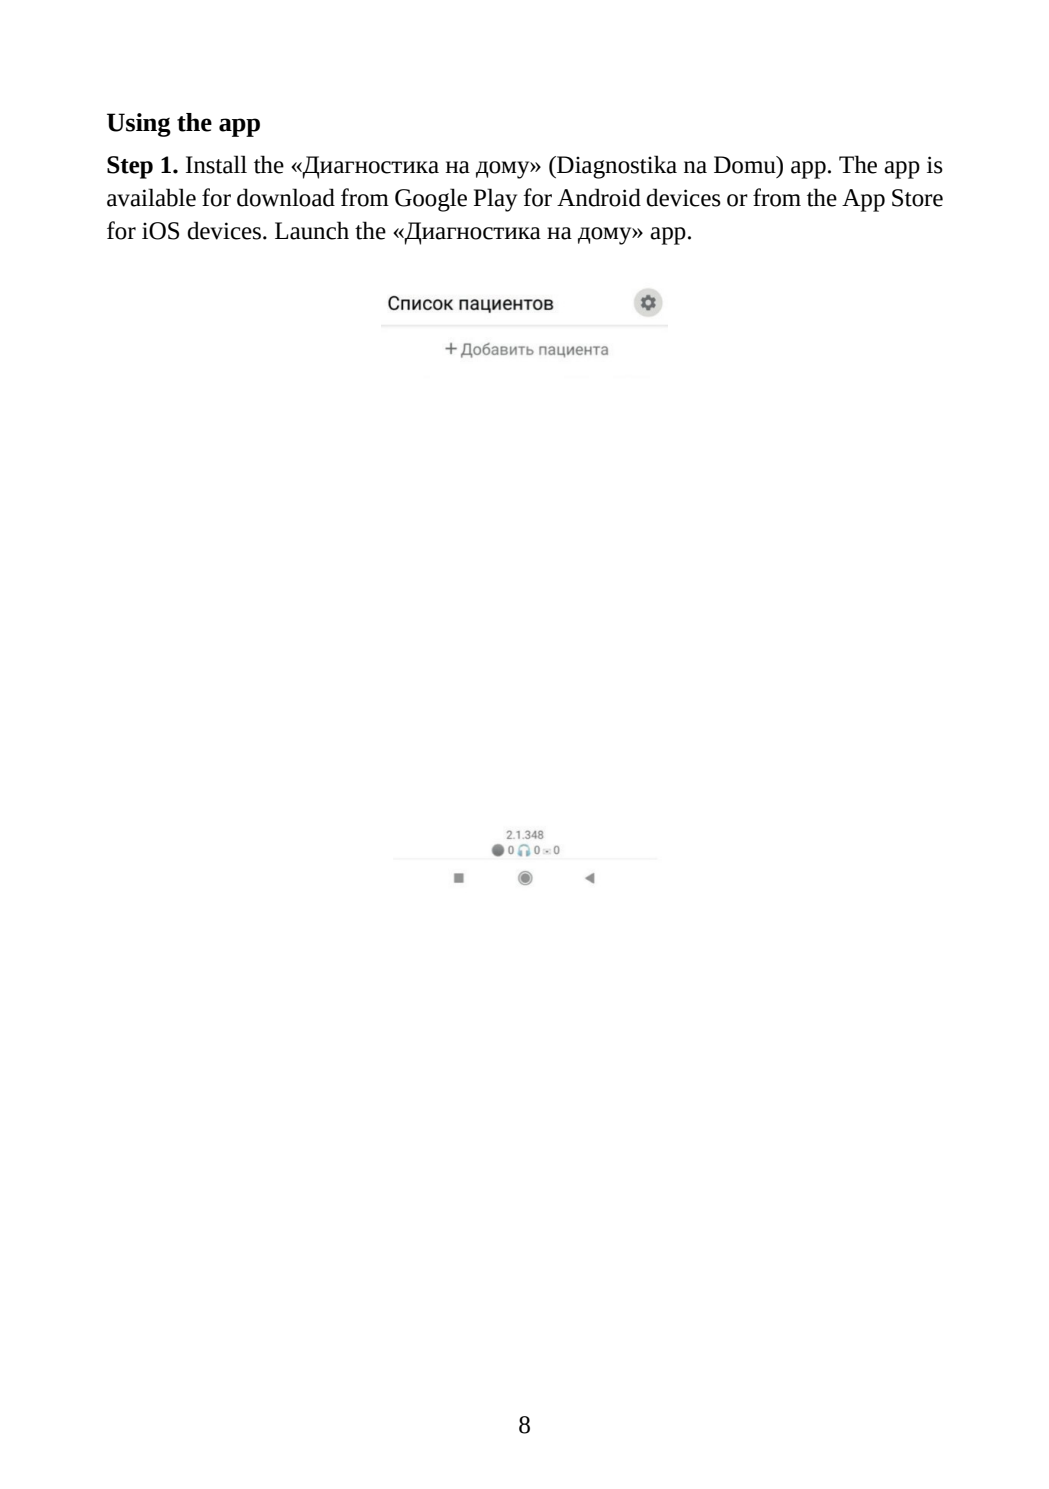
Step 1. Install the «Диагностика на дому» (Diagnostika na Domu) app. The app is
available for download from Google Play for Android devices or from the App Store
for iOS devices. Launch the «Диагностика на дому» app.
8
Page text
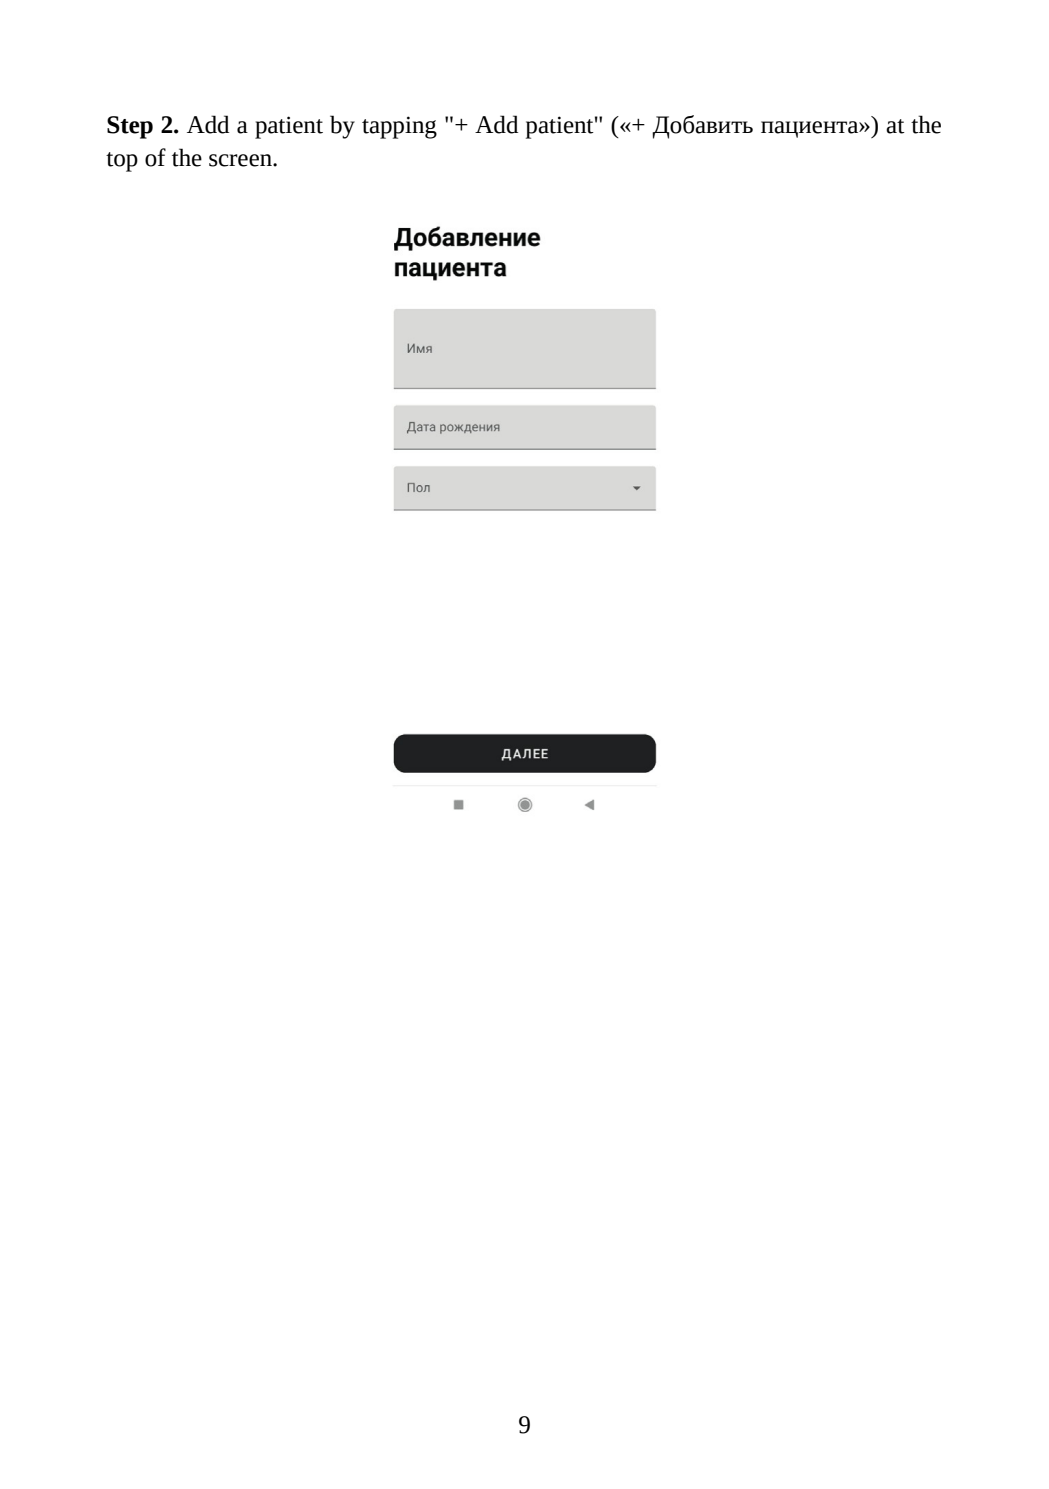
Step 2. Add a patient by tapping "+ Add patient" («+ Добавить пациента») at the
top of the screen.
9
Page text
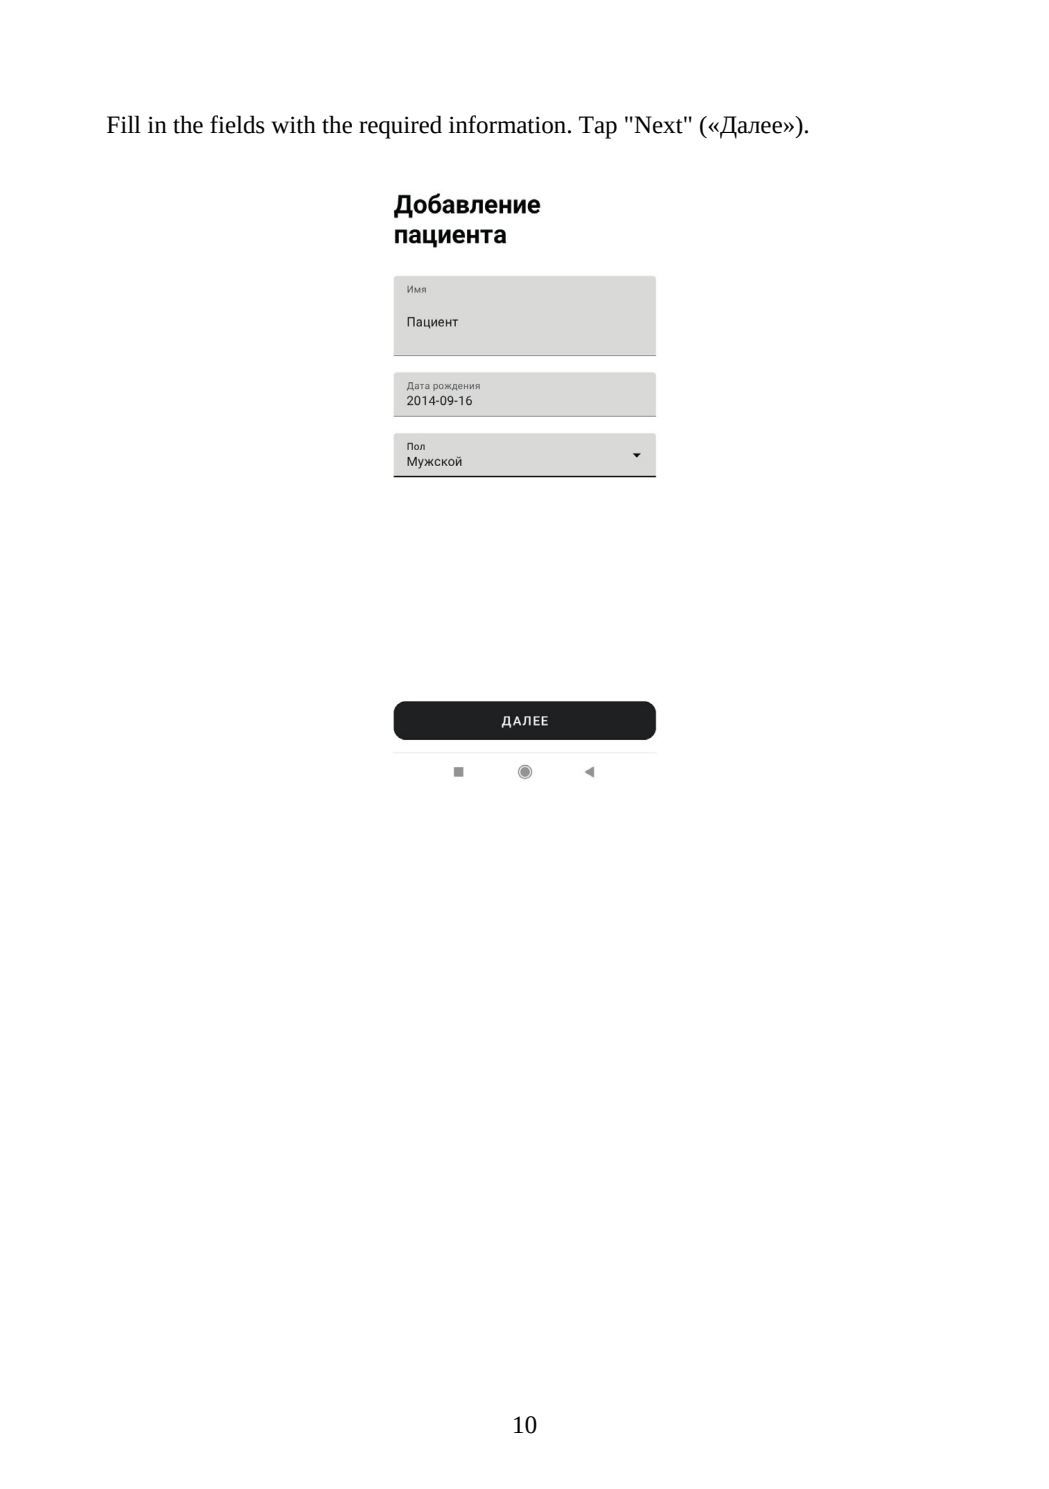
Fill in the fields with the required information. Tap "Next" («Далее»).
10
Page text
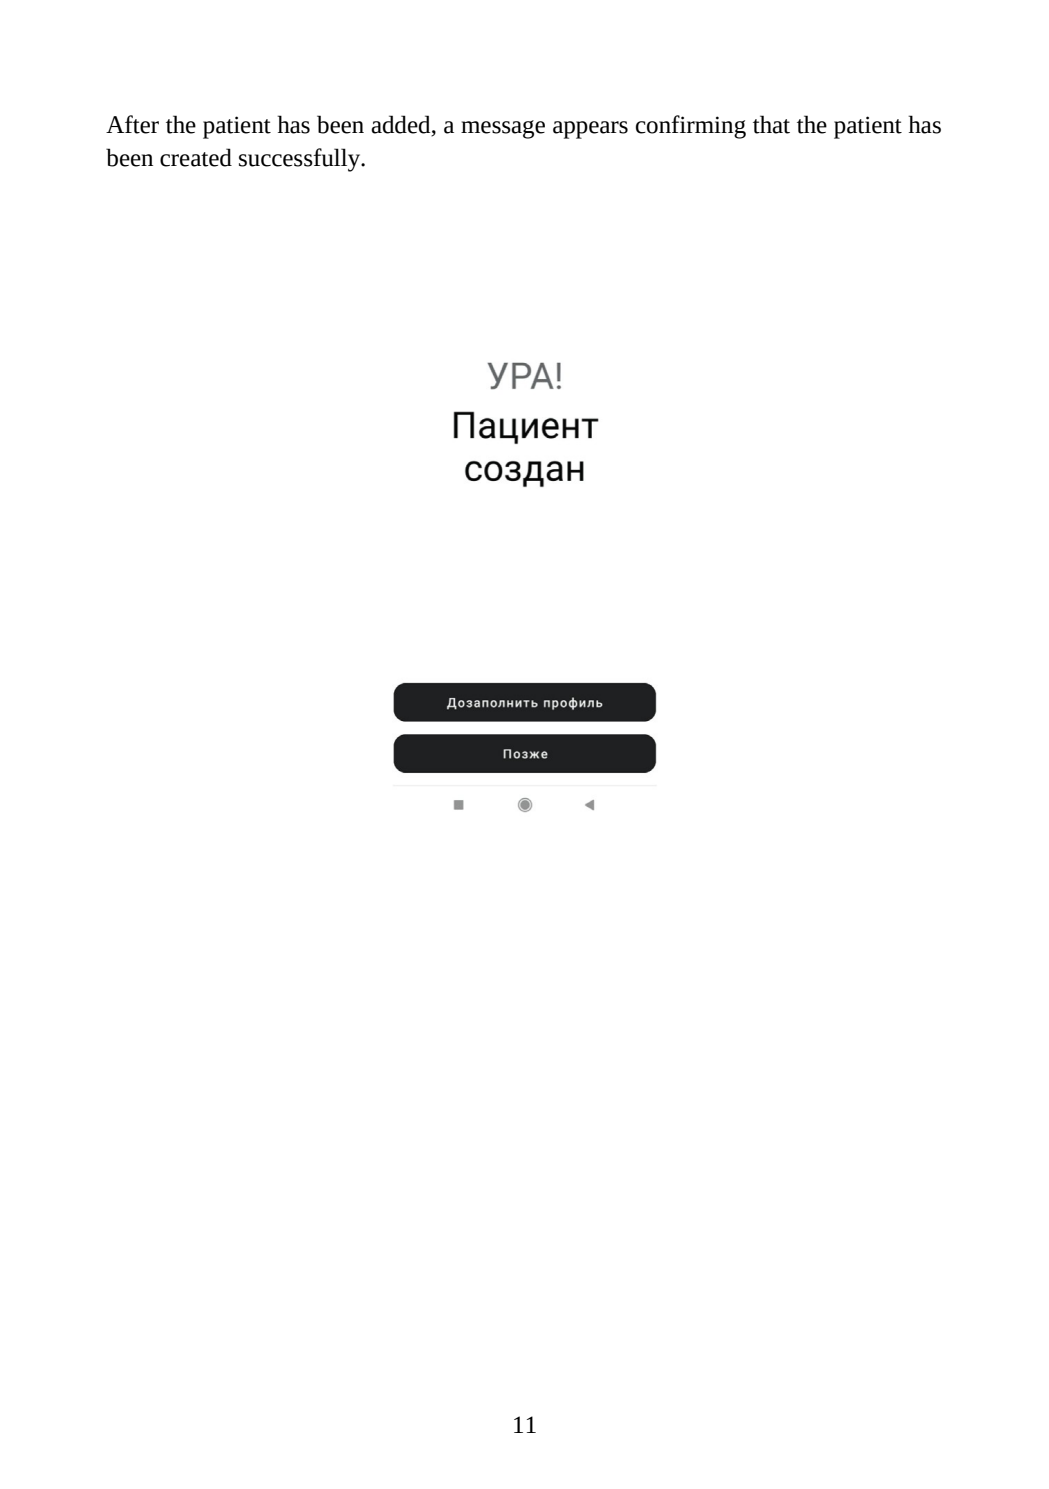
After the patient has been added, a message appears confirming that the patient has
been created successfully.
11
Page text
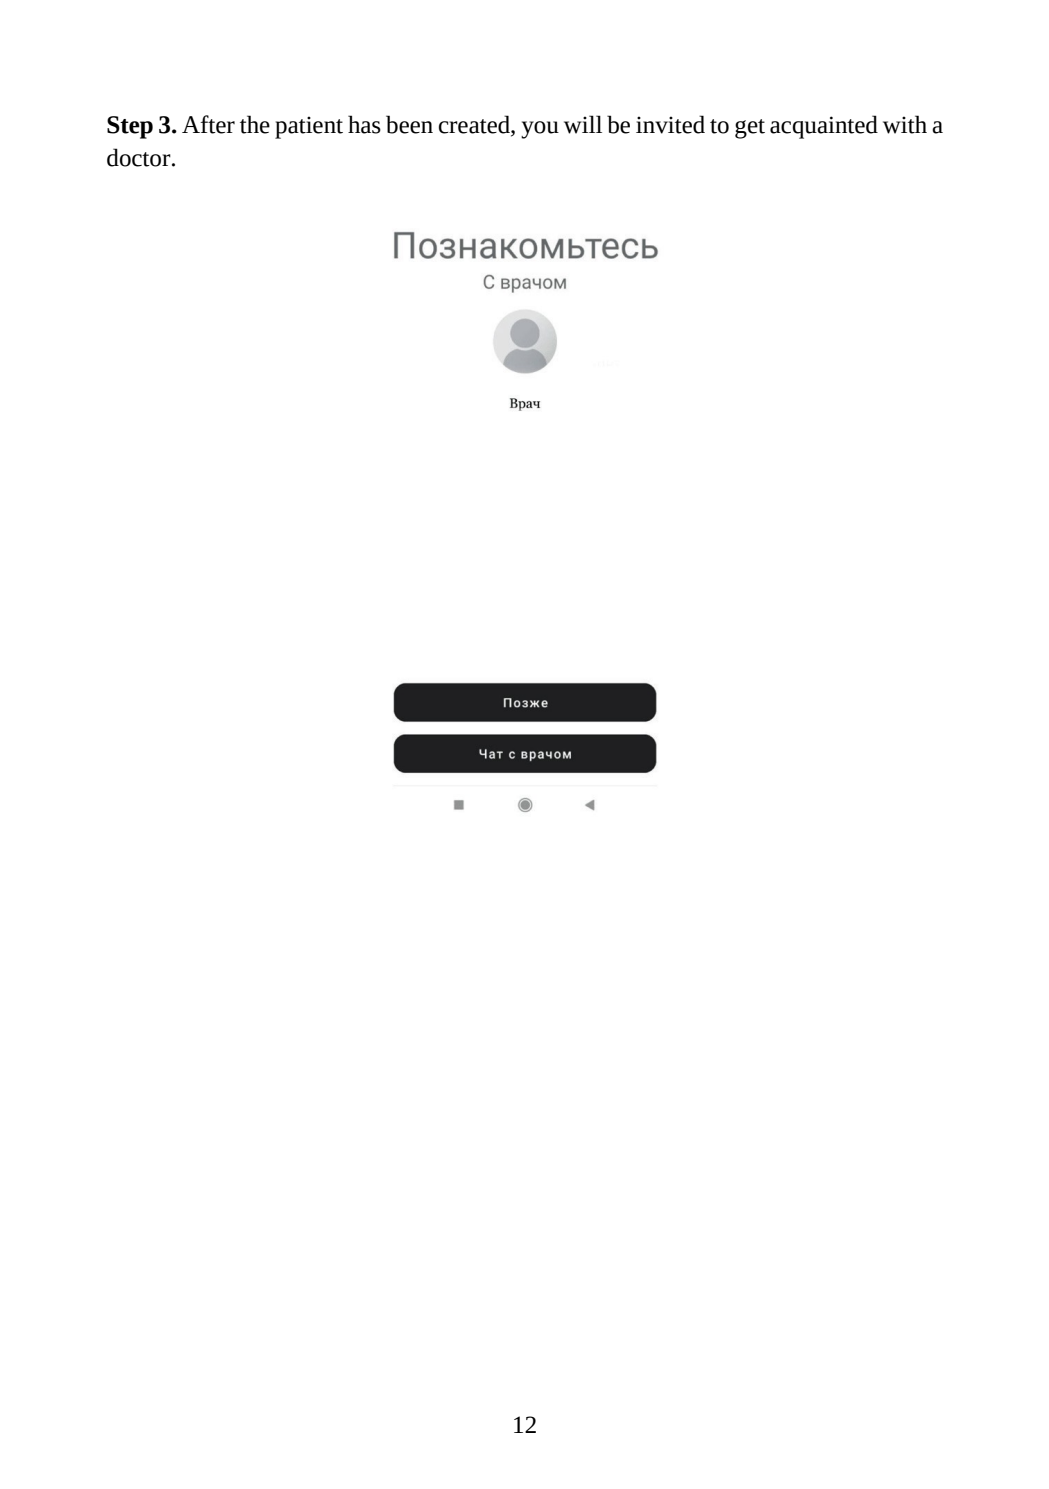
Step 3. After the patient has been created, you will be invited to get acquainted with a
doctor.
12
Page text
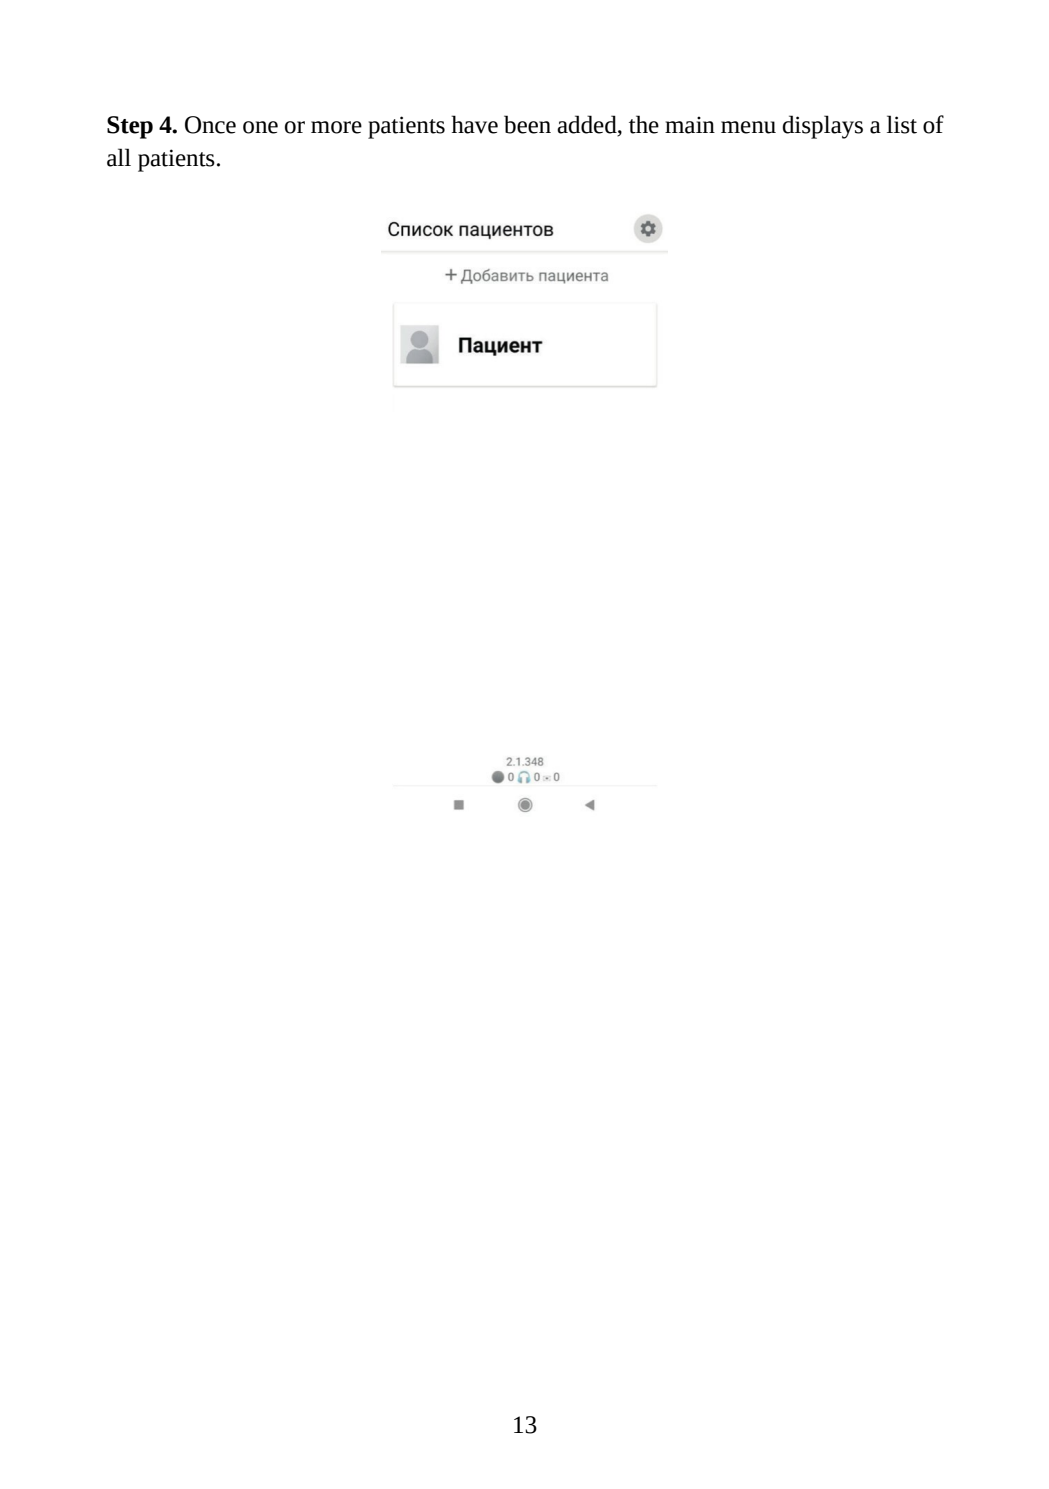
Step 4. Once one or more patients have been added, the main menu displays a list of
all patients.
13
Page text
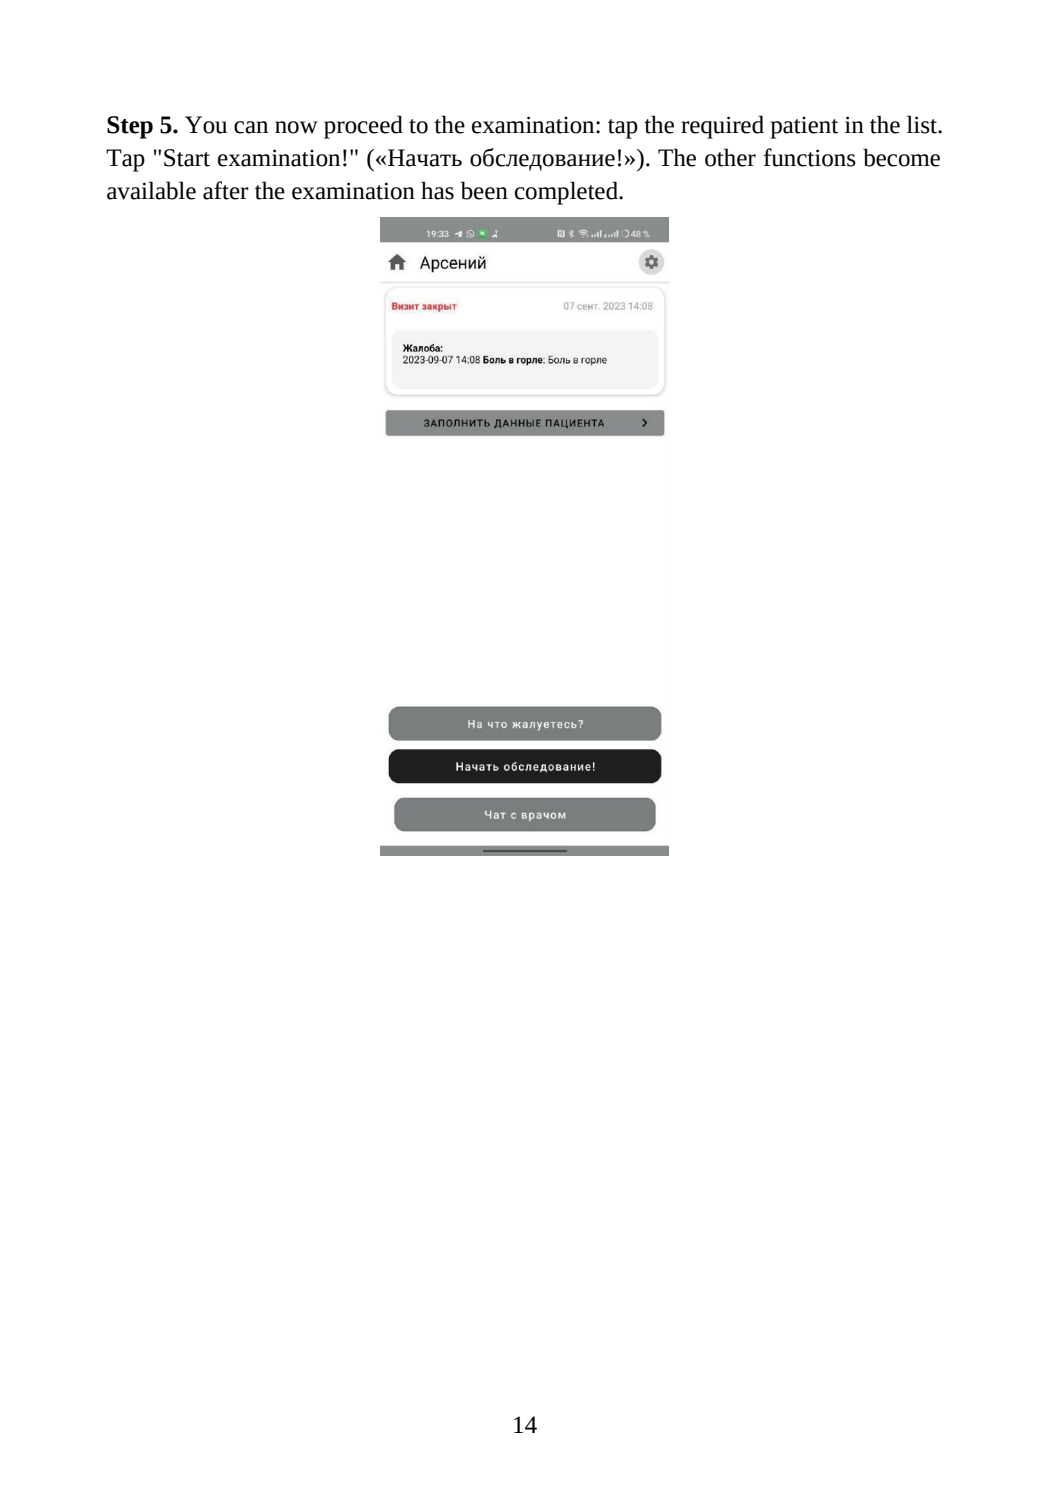
Step 5. You can now proceed to the examination: tap the required patient in the list.
Tap "Start examination!" («Начать обследование!»). The other functions become
available after the examination has been completed.
14
Page text
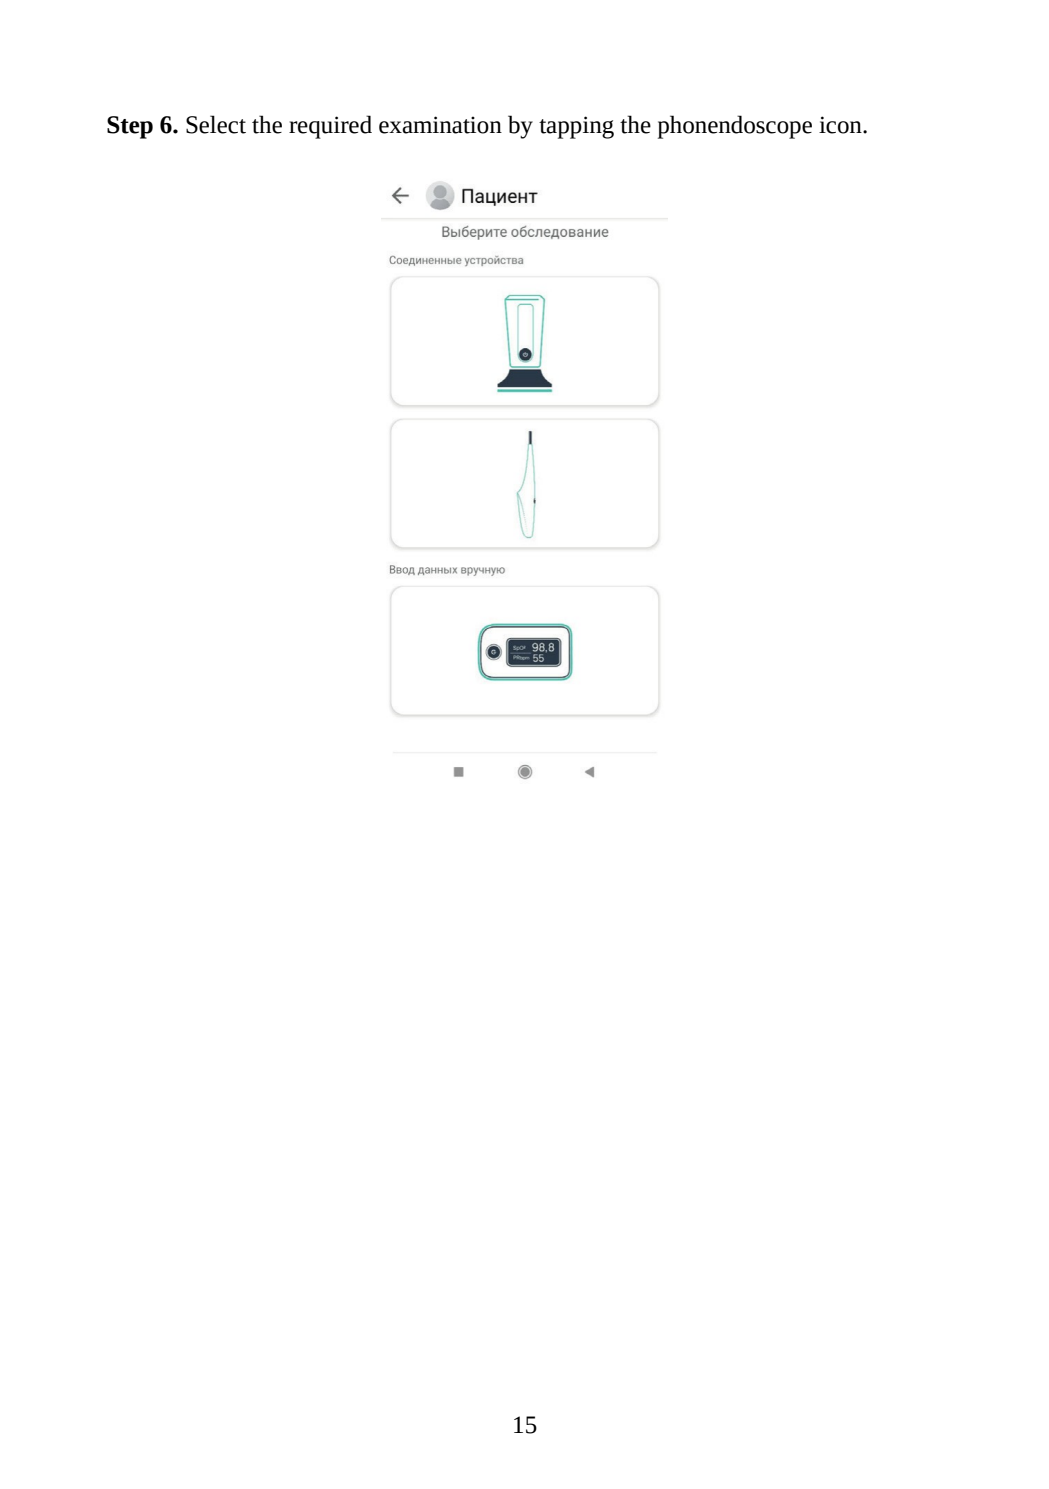
Step 6. Select the required examination by tapping the phonendoscope icon.
15
Page text
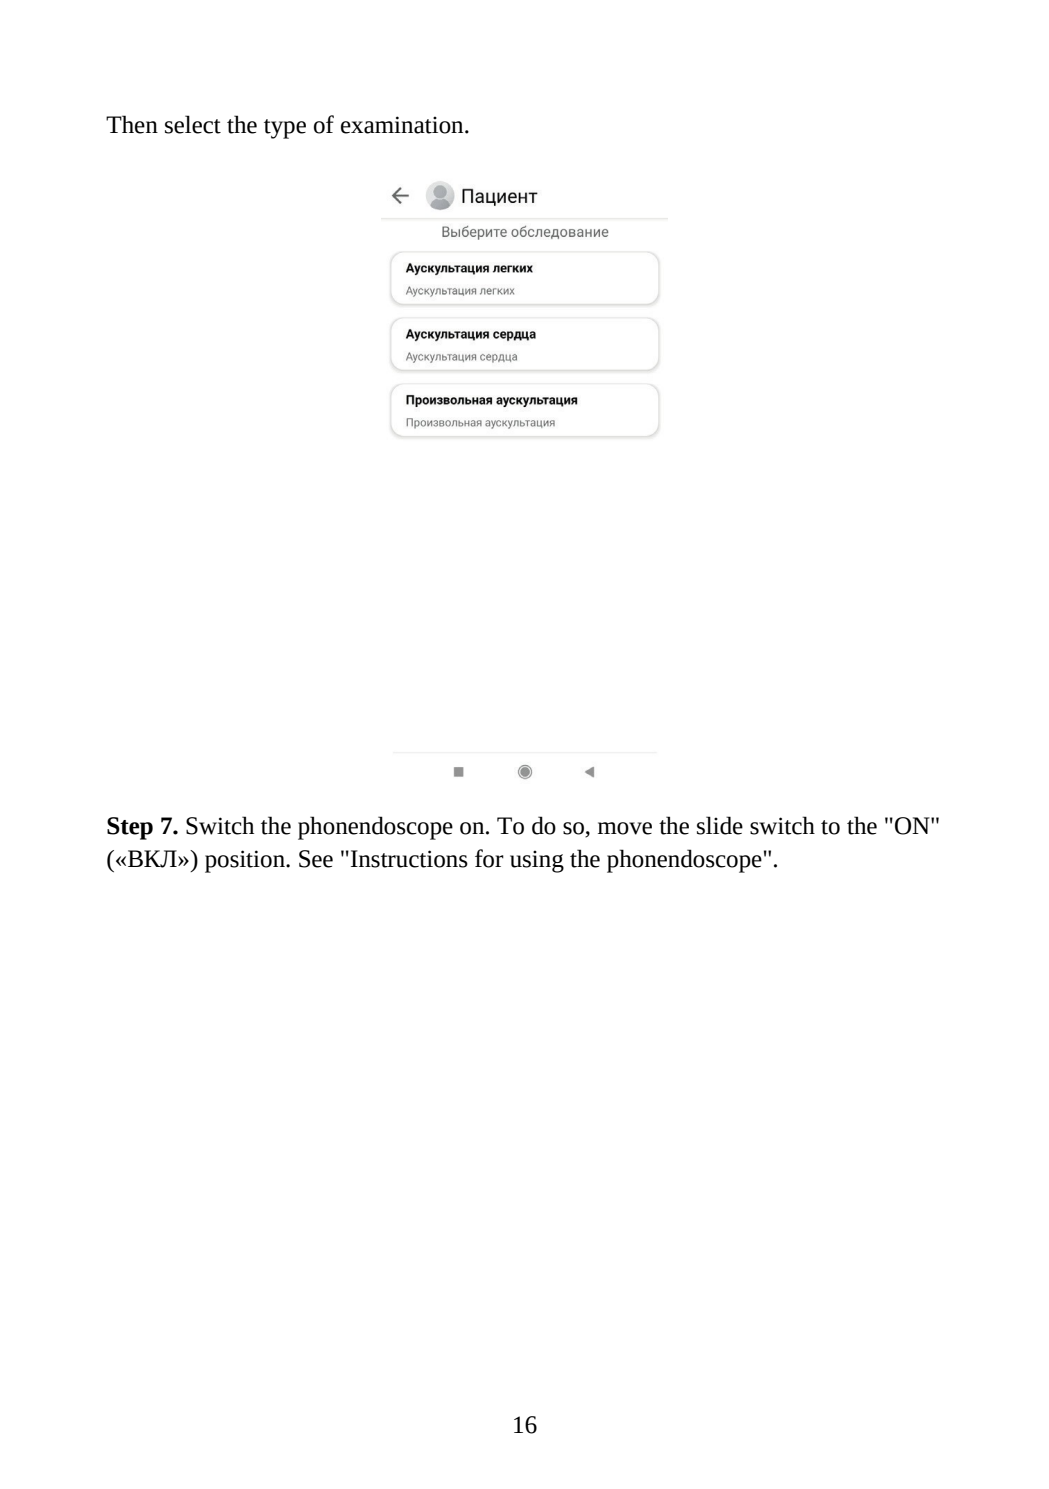
Then select the type of examination.
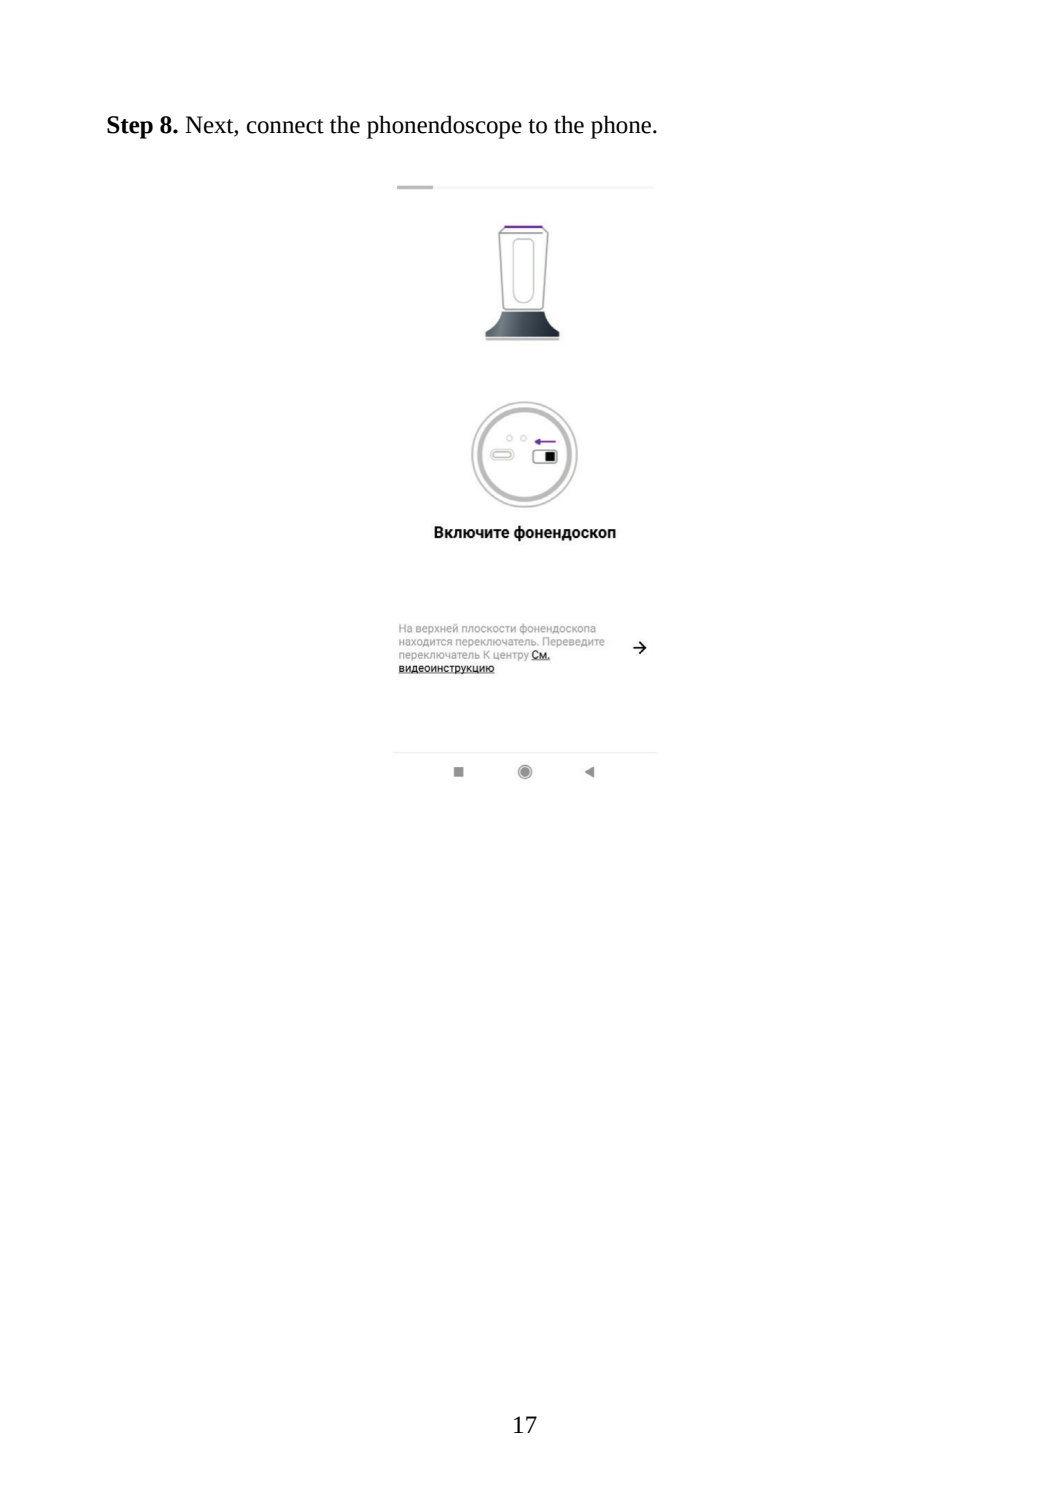
Step 7. Switch the phonendoscope on. To do so, move the slide switch to the "ON"
(«ВКЛ») position. See "Instructions for using the phonendoscope".
16
Page text
Step 8. Next, connect the phonendoscope to the phone.
17
Page text
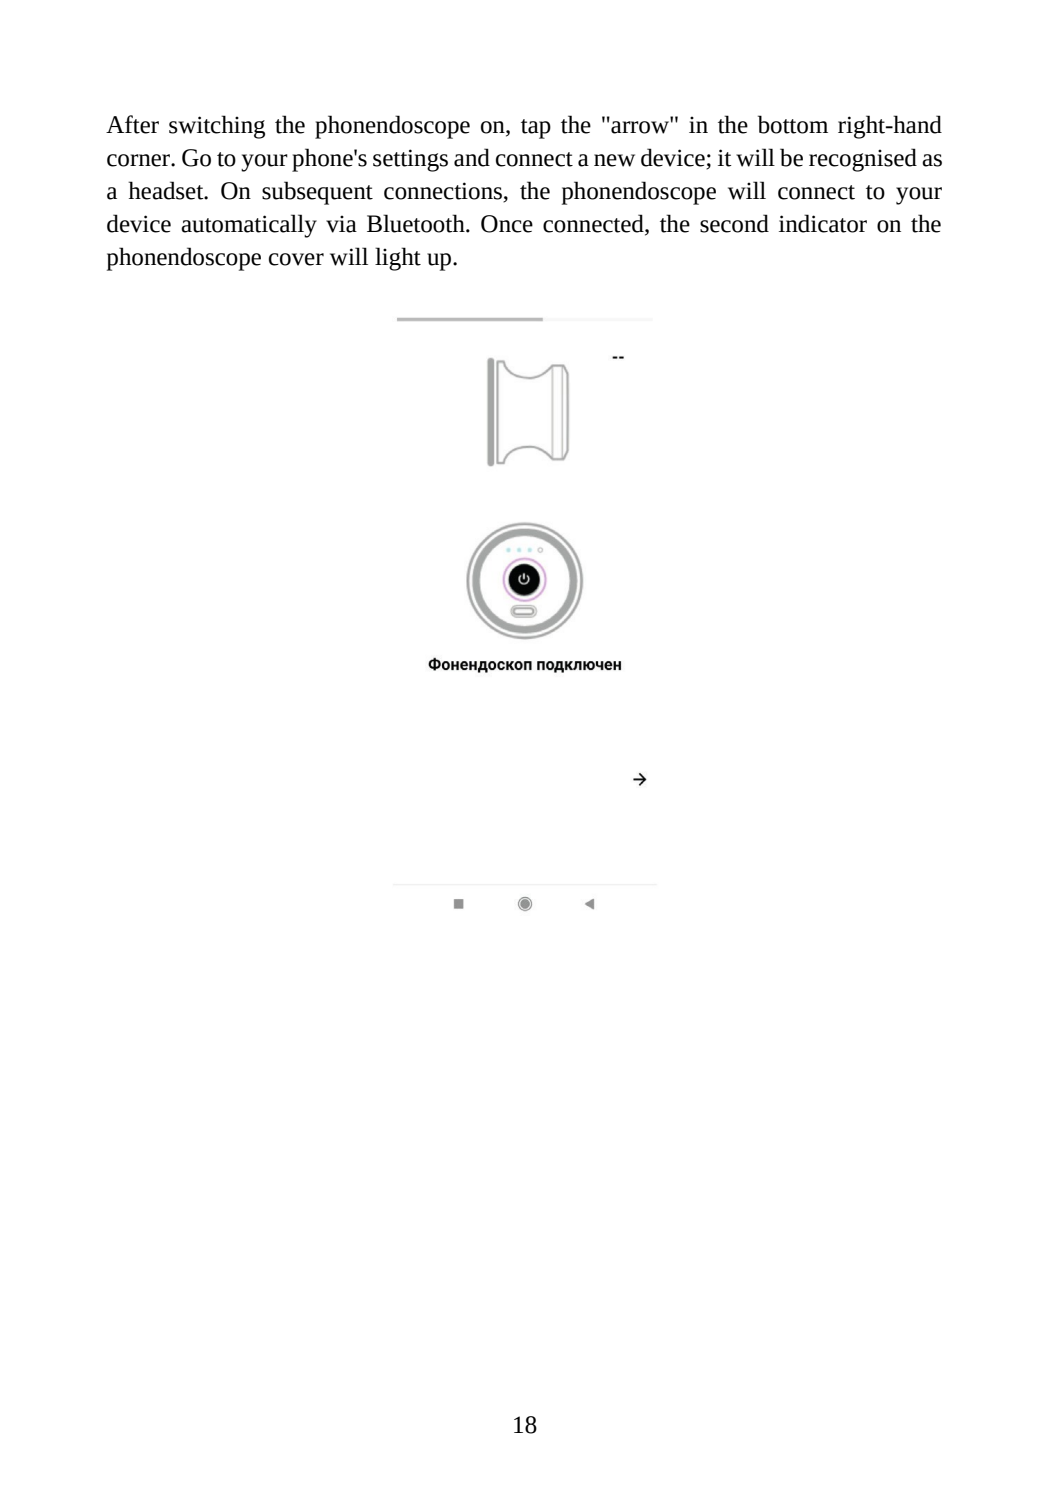
After switching the phonendoscope on, tap the "arrow" in the bottom right-hand
corner. Go to your phone's settings and connect a new device; it will be recognised as
a headset. On subsequent connections, the phonendoscope will connect to your
device automatically via Bluetooth. Once connected, the second indicator on the
phonendoscope cover will light up.
18
Page text
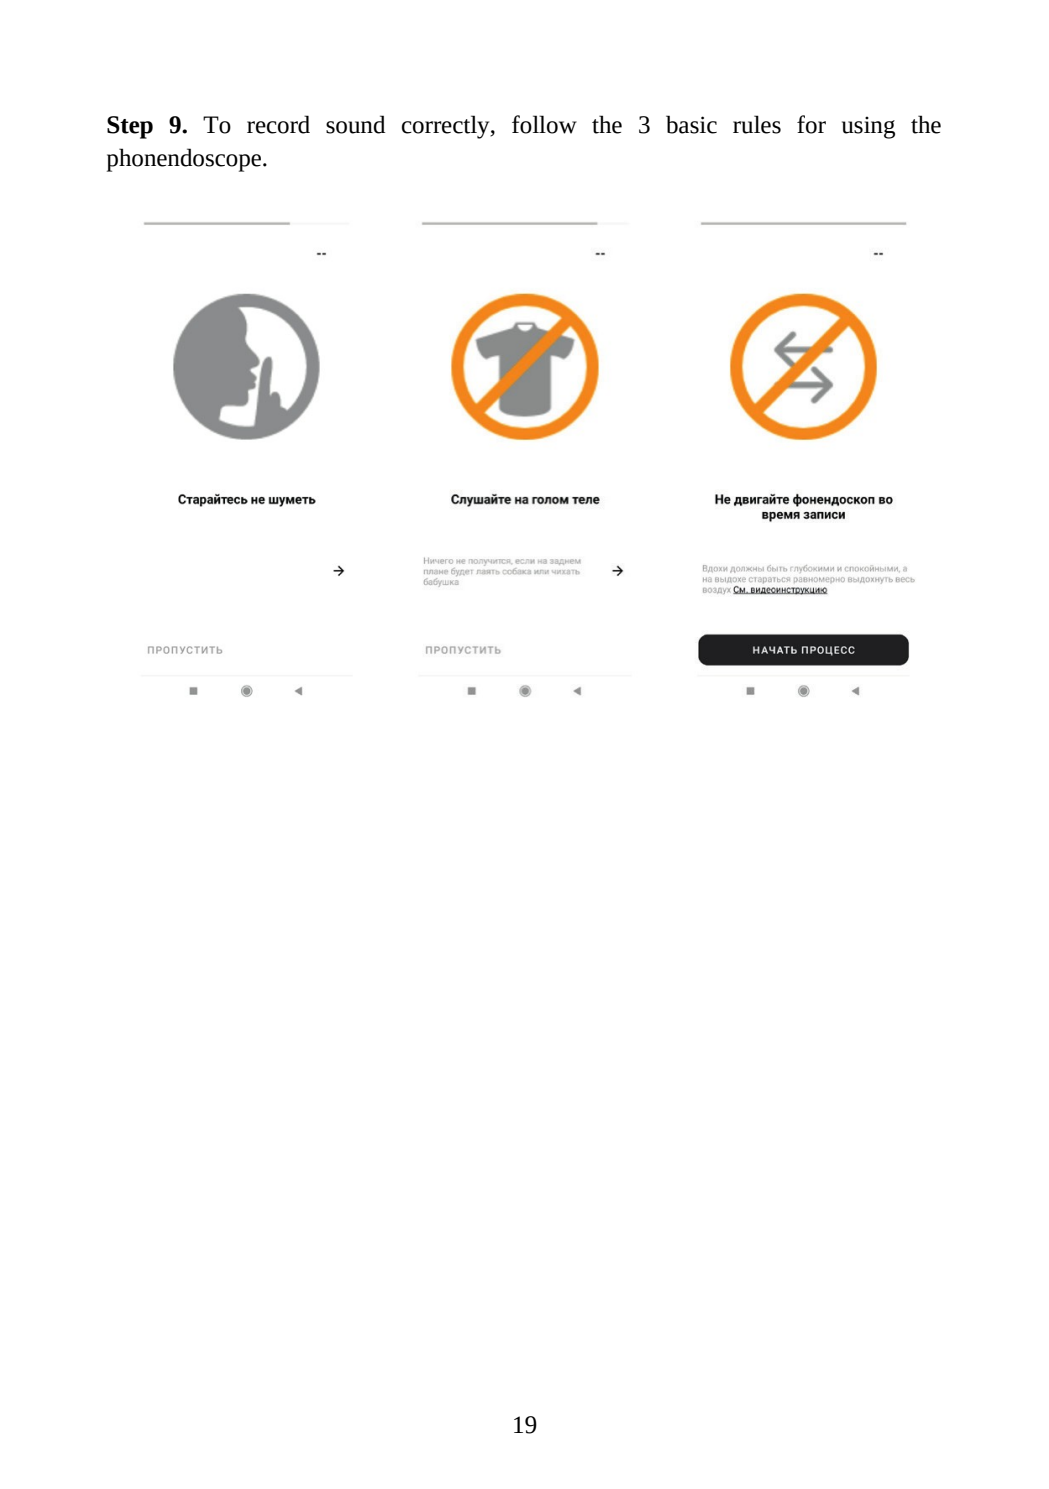
Step 9. To record sound correctly, follow the 3 basic rules for using the
phonendoscope.
19
Page text
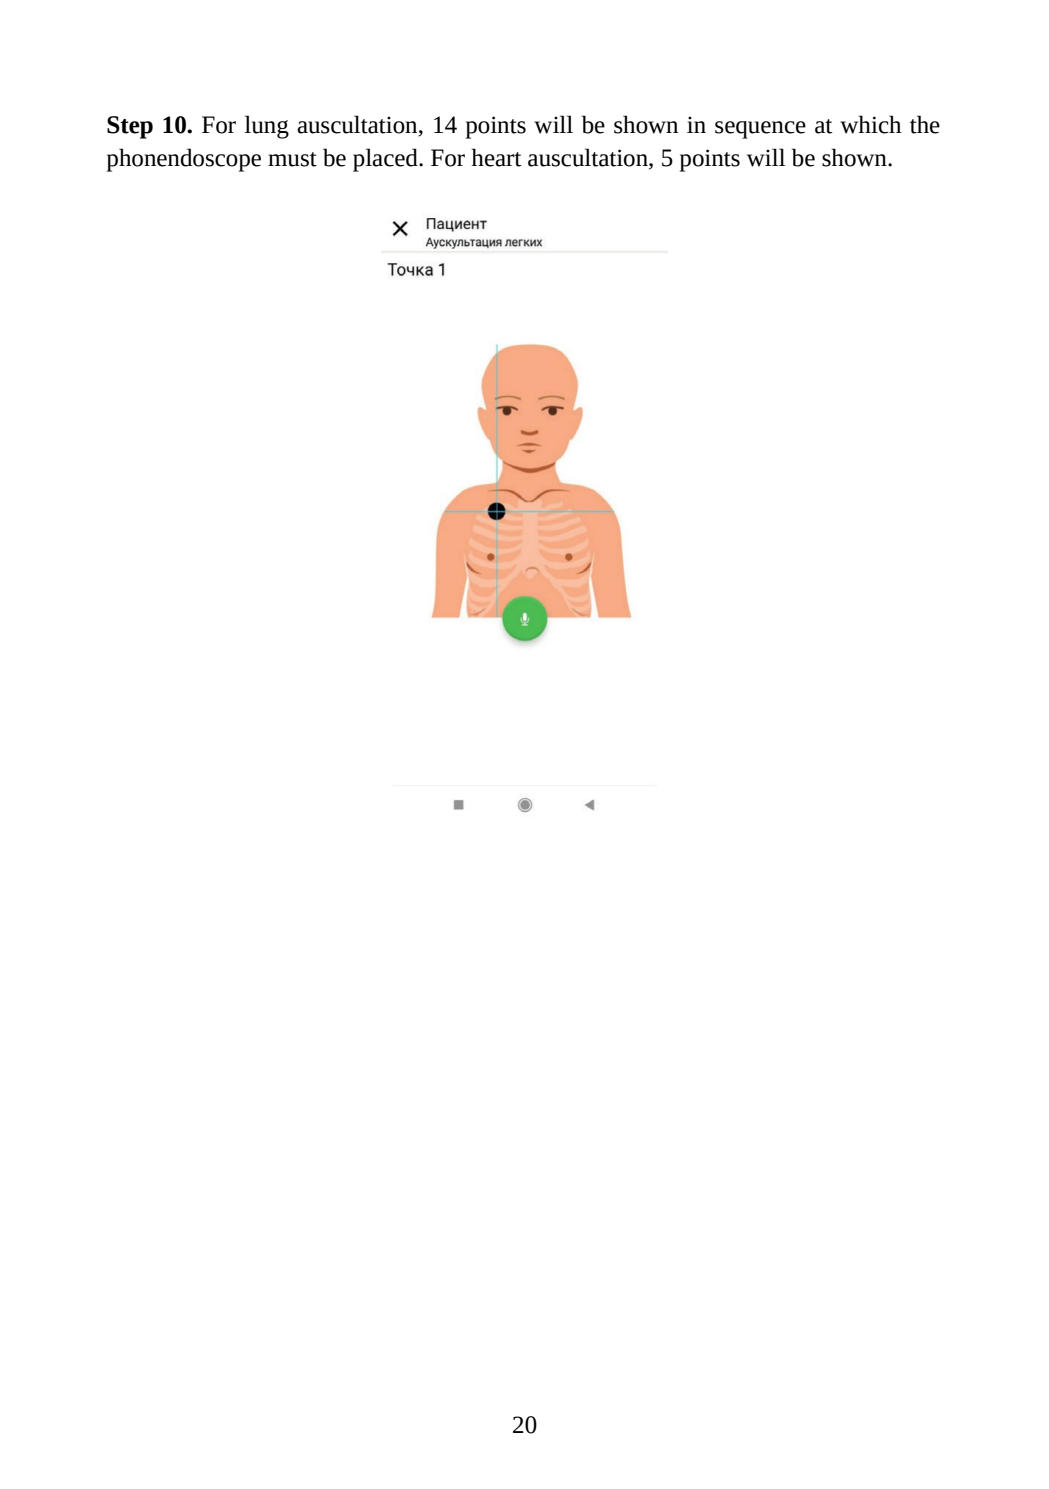
Step 10. For lung auscultation, 14 points will be shown in sequence at which the
phonendoscope must be placed. For heart auscultation, 5 points will be shown.
20
Page text
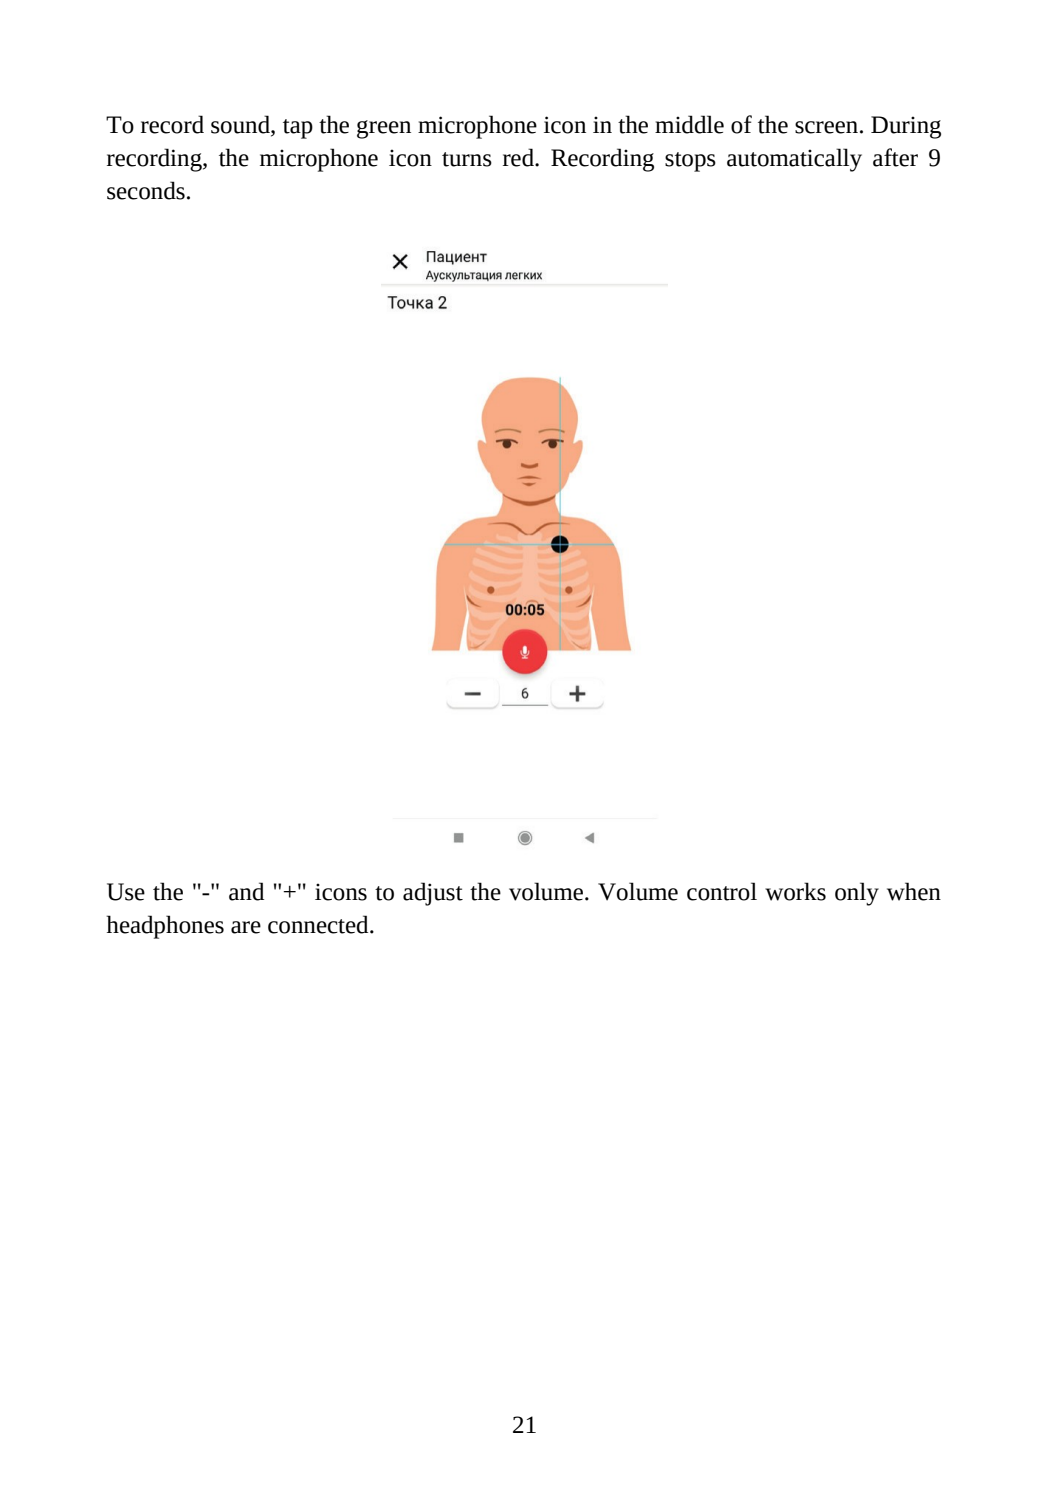
To record sound, tap the green microphone icon in the middle of the screen. During
recording, the microphone icon turns red. Recording stops automatically after 9
seconds.
Use the "-" and "+" icons to adjust the volume. Volume control works only when
headphones are connected.
21
Page text
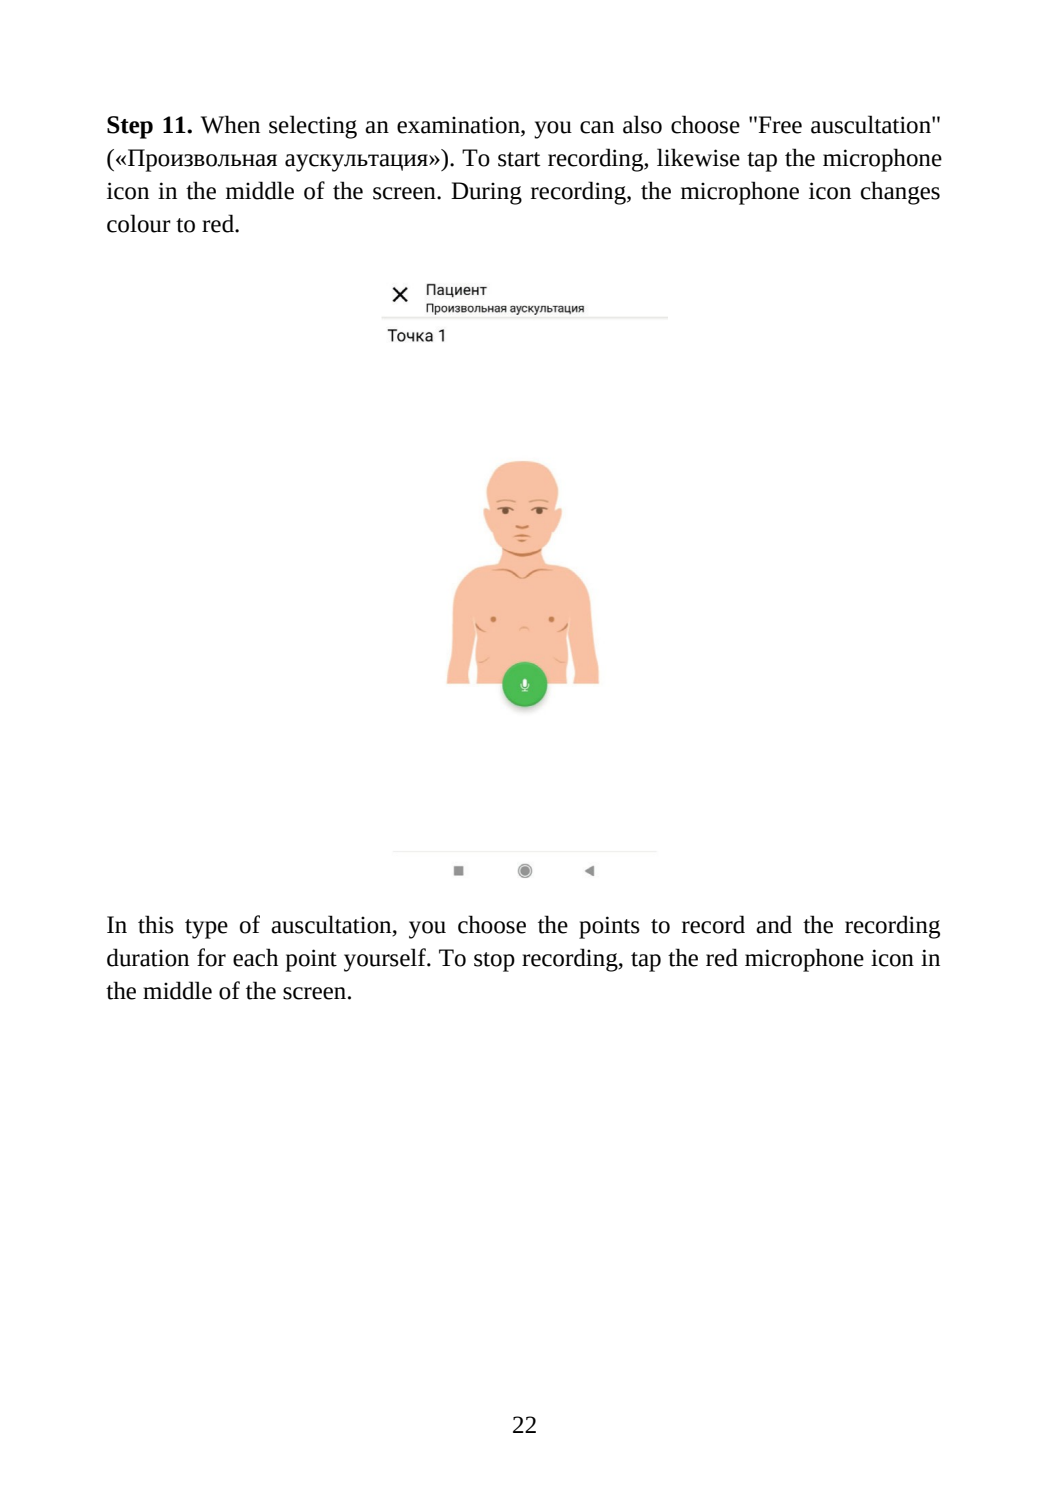
Step 11. When selecting an examination, you can also choose "Free auscultation"
(«Произвольная аускультация»). To start recording, likewise tap the microphone
icon in the middle of the screen. During recording, the microphone icon changes
colour to red.
In this type of auscultation, you choose the points to record and the recording
duration for each point yourself. To stop recording, tap the red microphone icon in
the middle of the screen.
22
Page text
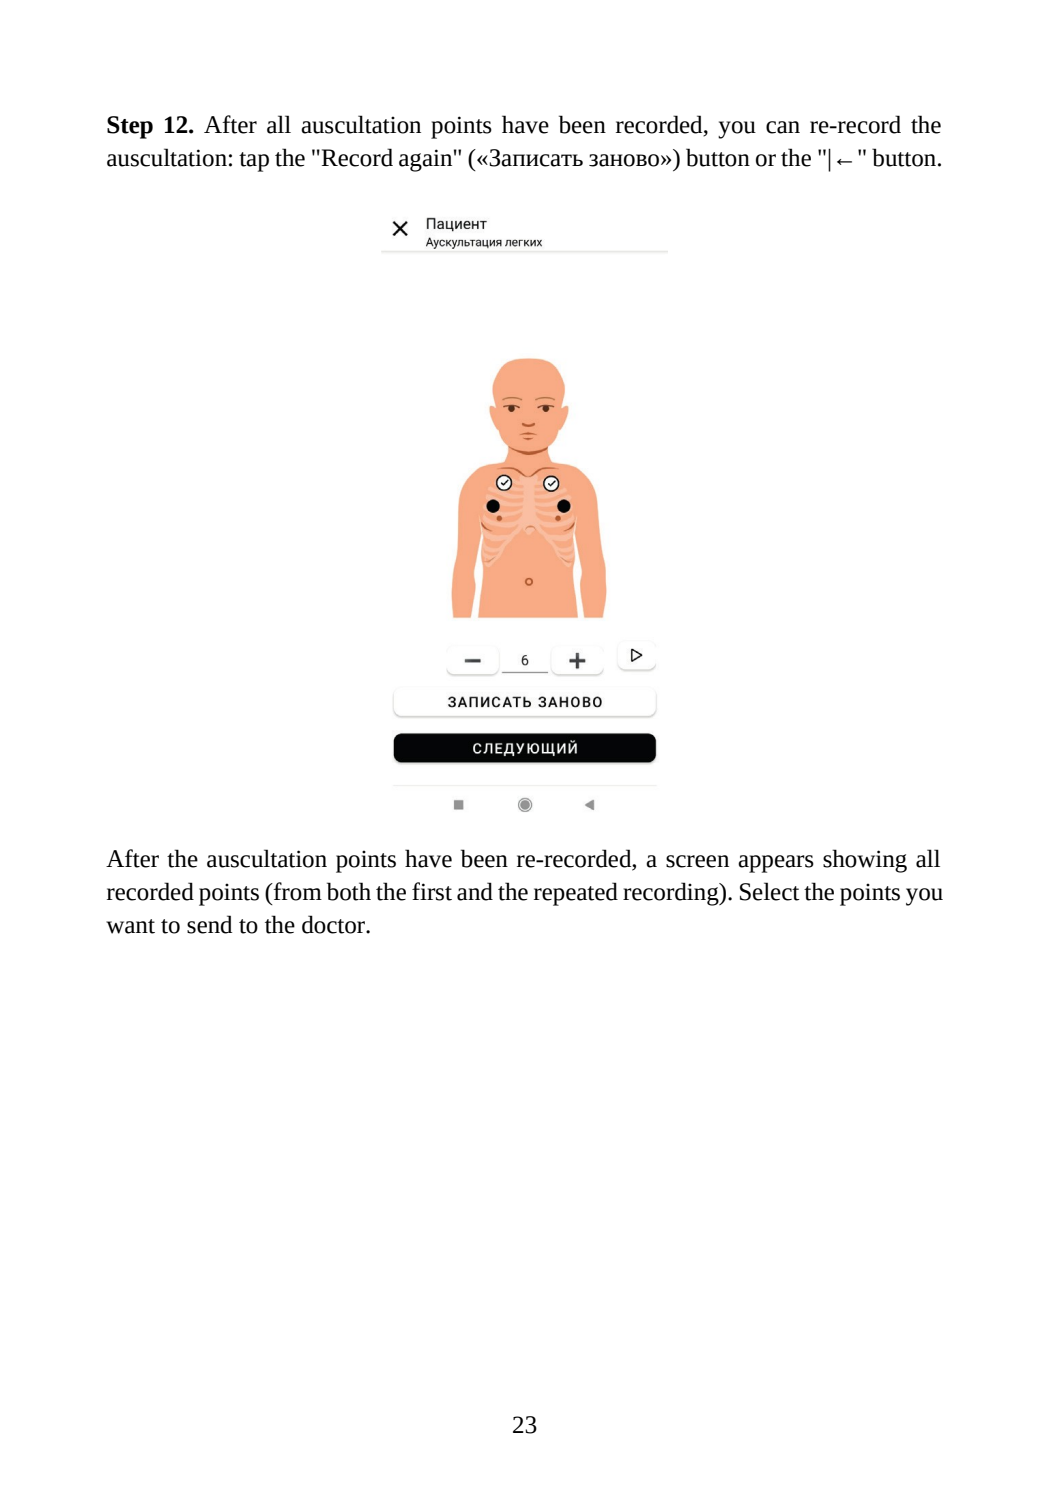
Step 12. After all auscultation points have been recorded, you can re-record the
auscultation: tap the "Record again" («Записать заново») button or the "|←" button.
After the auscultation points have been re-recorded, a screen appears showing all
recorded points (from both the first and the repeated recording). Select the points you
want to send to the doctor.
23
Page text
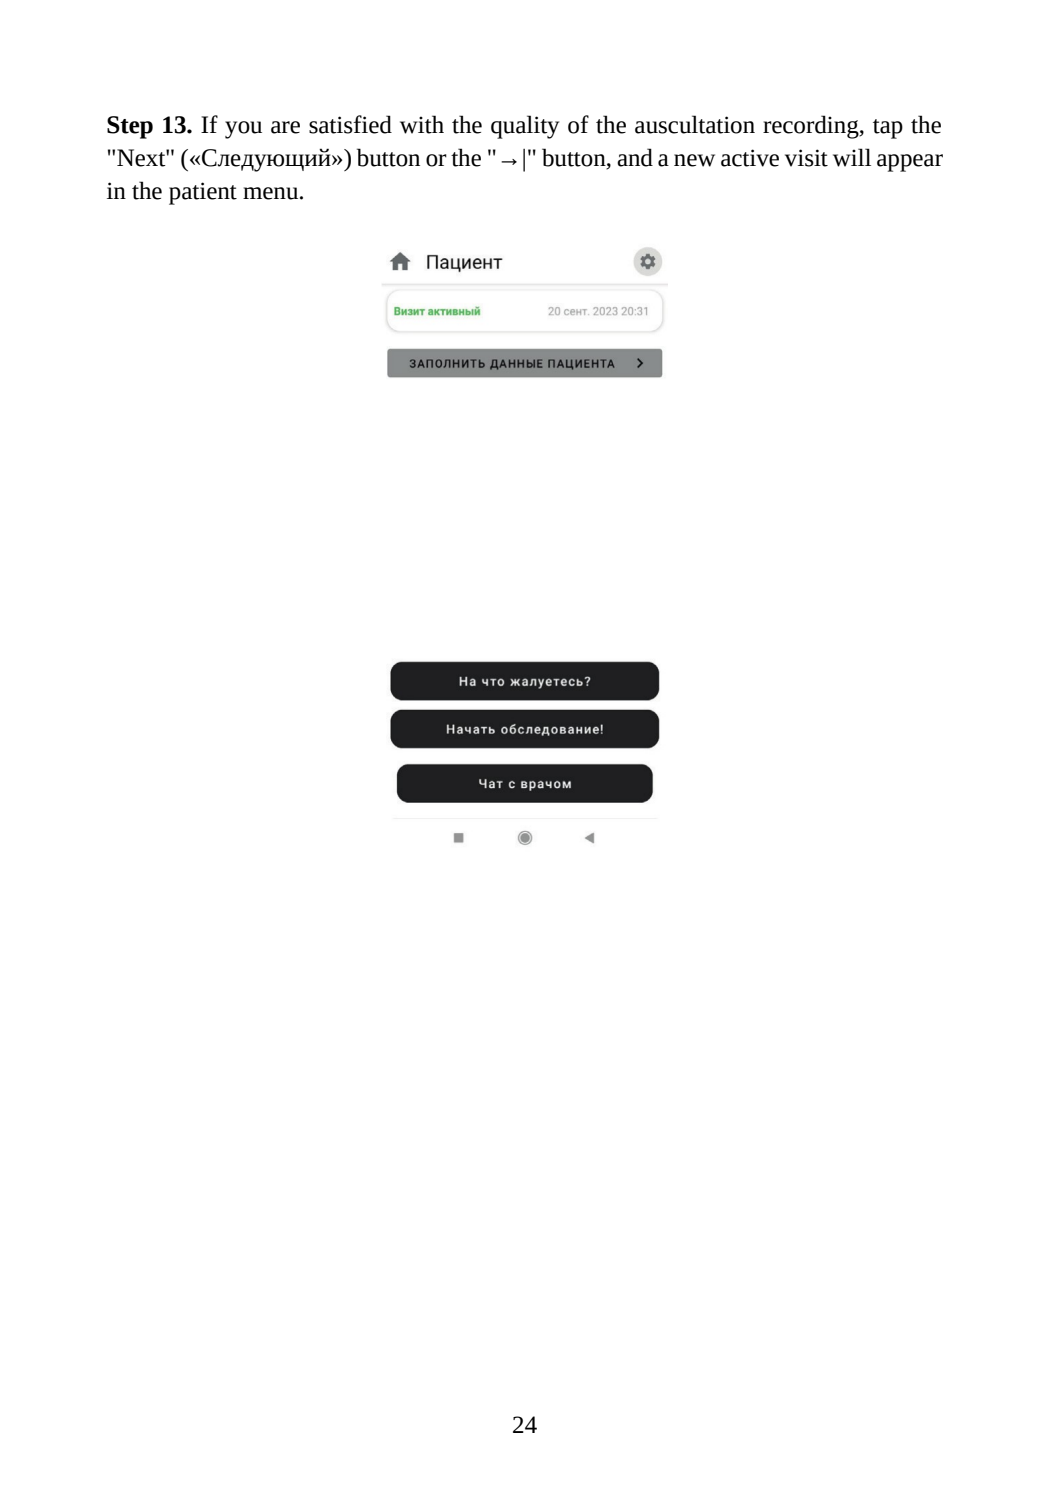
Step 13. If you are satisfied with the quality of the auscultation recording, tap the
"Next" («Следующий») button or the "→|" button, and a new active visit will appear
in the patient menu.
24
Page text
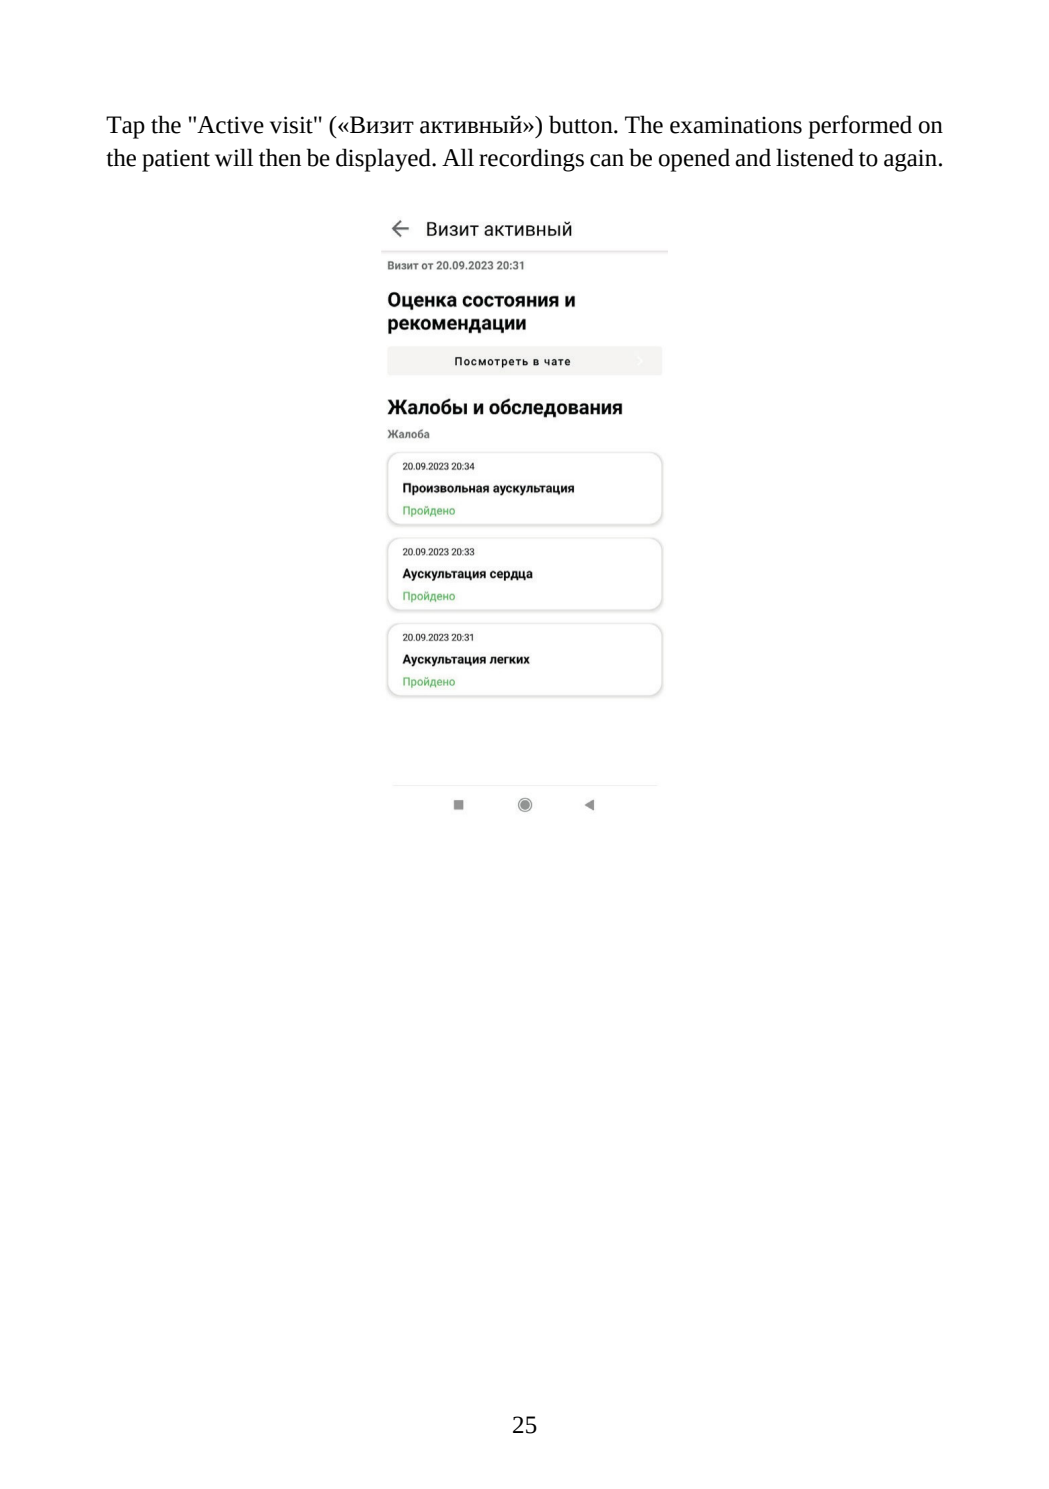
Tap the "Active visit" («Визит активный») button. The examinations performed on
the patient will then be displayed. All recordings can be opened and listened to again.
25
Page text
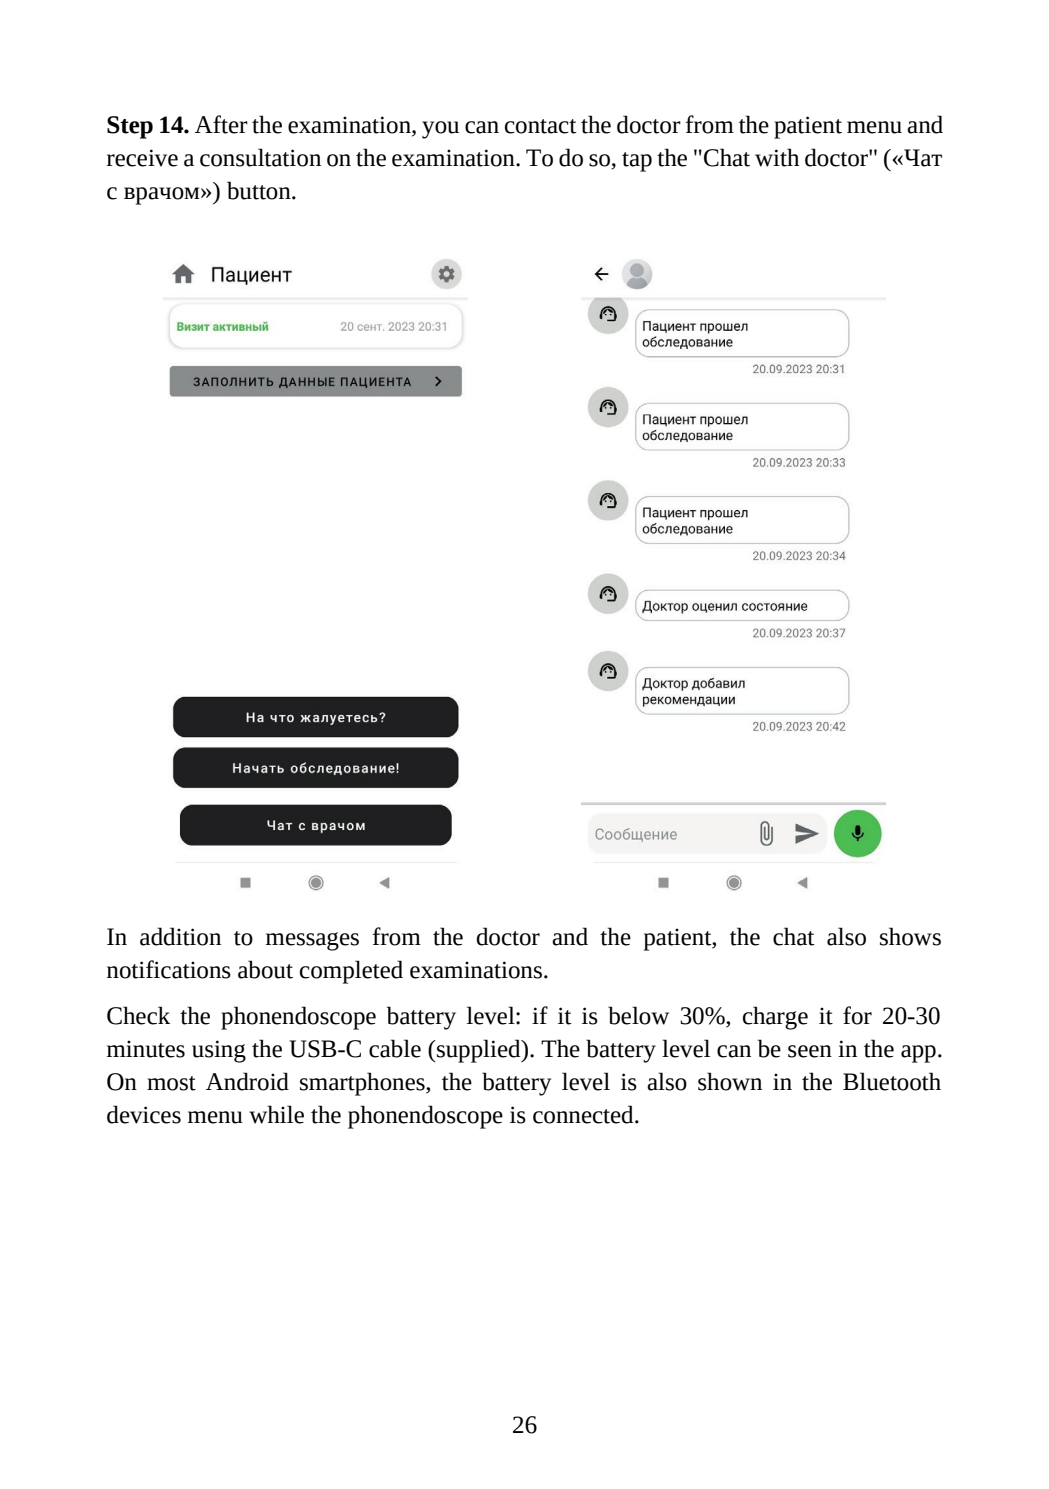
Step 14. After the examination, you can contact the doctor from the patient menu and
receive a consultation on the examination. To do so, tap the "Chat with doctor" («Чат
с врачом») button.
In addition to messages from the doctor and the patient, the chat also shows
notifications about completed examinations.
Check the phonendoscope battery level: if it is below 30%, charge it for 20-30
minutes using the USB-C cable (supplied). The battery level can be seen in the app.
On most Android smartphones, the battery level is also shown in the Bluetooth
devices menu while the phonendoscope is connected.
26
Page text
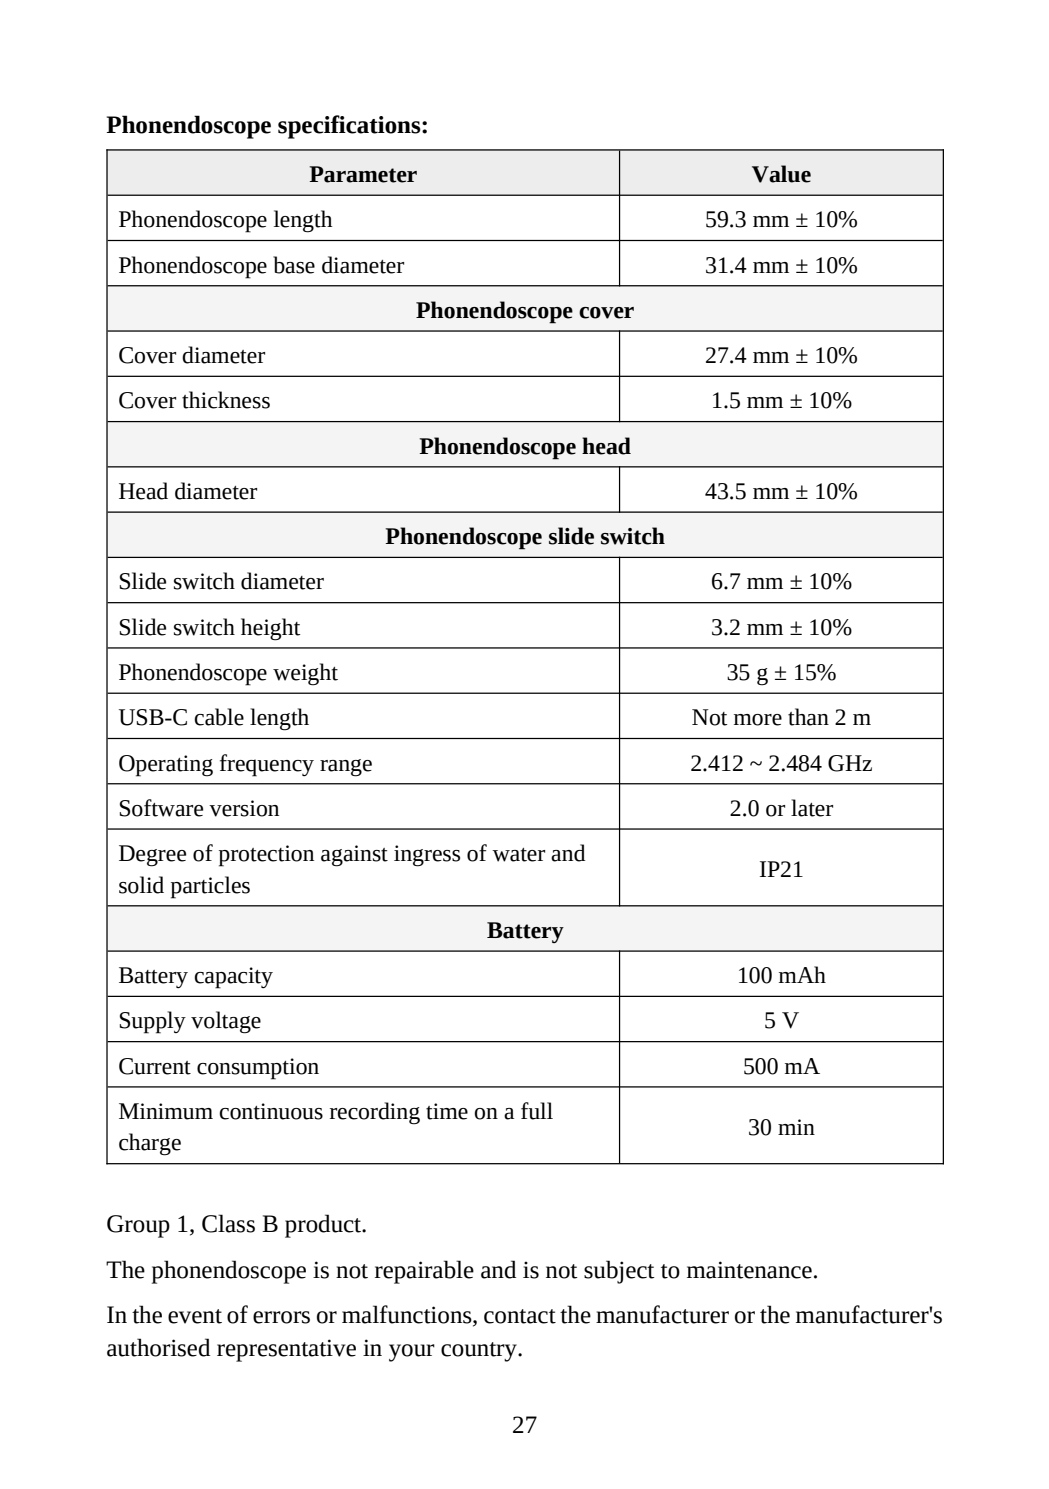
Phonendoscope specifications:
Parameter Value
Phonendoscope length 59.3 mm ± 10%
Phonendoscope base diameter 31.4 mm ± 10%
Phonendoscope cover
Cover diameter 27.4 mm ± 10%
Cover thickness 1.5 mm ± 10%
Phonendoscope head
Head diameter 43.5 mm ± 10%
Phonendoscope slide switch
Slide switch diameter 6.7 mm ± 10%
Slide switch height 3.2 mm ± 10%
Phonendoscope weight 35 g ± 15%
USB-C cable length Not more than 2 m
Operating frequency range 2.412 ~ 2.484 GHz
Software version 2.0 or later
Degree of protection against ingress of water and
solid particles IP21
Battery
Battery capacity 100 mAh
Supply voltage 5 V
Current consumption 500 mA
Minimum continuous recording time on a full
charge 30 min
Group 1, Class B product.
The phonendoscope is not repairable and is not subject to maintenance.
In the event of errors or malfunctions, contact the manufacturer or the manufacturer's
authorised representative in your country.
27
Page text
Mobile device requirements:
Android 9.0 or later. Storage of at least 32 GB. RAM of at least 4 GB.
iOS 15 or later. Storage of at least 32 GB. RAM of at least 4 GB.
The device must be equipped with Bluetooth.
3. Cleaning and disinfection
Cleaning and disinfection must be carried out after each use by wiping with an
alcohol wipe soaked in a 70% ethyl alcohol solution. The phonendoscope is not
sterile and must not be sterilised!
4. Disposal
The phonendoscope shall be disposed of in accordance with the local legislation of
the country of use as epidemiologically safe waste, similar in composition to
municipal solid waste.
The packaging may be disposed of as household waste.
In the Russian Federation, disposal of unused devices shall be carried out in
accordance with the requirements of SanPiN 2.1.3684-21.
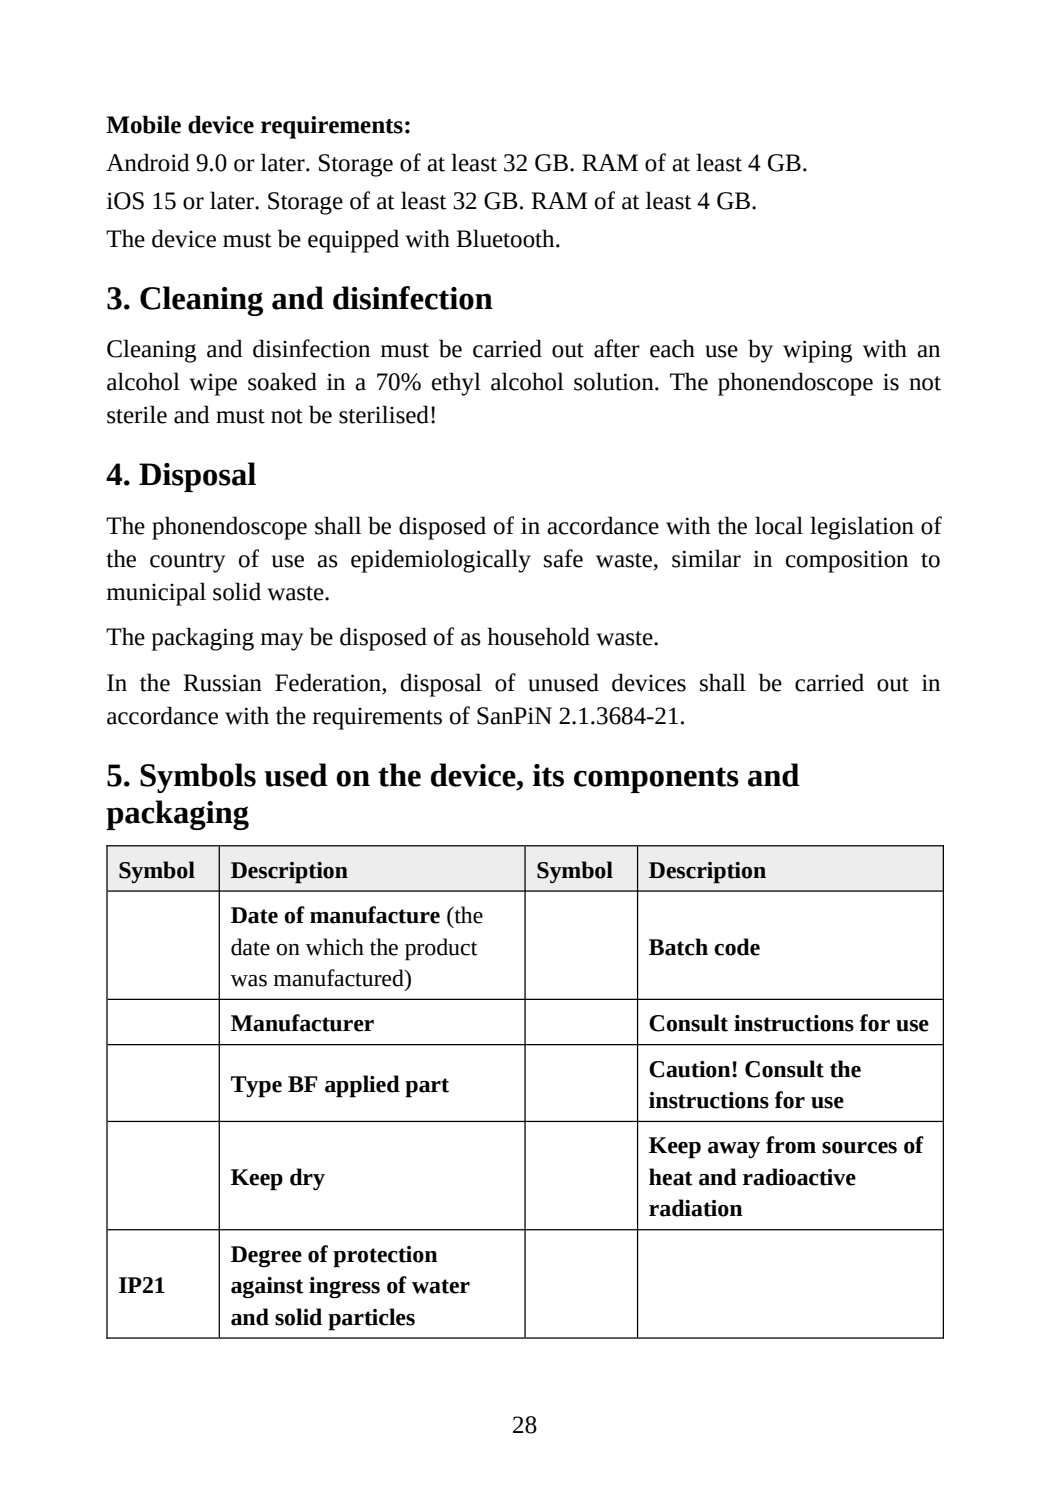
5. Symbols used on the device, its components and
packaging
Symbol Description Symbol Description
Date of manufacture (the
date on which the product
was manufactured)
Batch code
Manufacturer Consult instructions for use
Type BF applied part Caution! Consult the
instructions for use
Keep dry
Keep away from sources of
heat and radioactive
radiation
IP21
Degree of protection
against ingress of water
and solid particles
28
Page text
6. Transport and storage conditions
The device must remain operational when used under the following climatic
conditions: temperature from -10 °C to +40 °C, relative humidity not more than 80%
at 25 °C.
Devices packed in accordance with the requirements of these technical specifications
must withstand the following climatic factors during transport and storage:
temperature from -10 °C to +40 °C, relative humidity not more than 80% at 25 °C.
7. Service life and shelf life
The warranty period of operation and storage is 2 years from the date of manufacture.
8. Warranty
The manufacturer guarantees that the quality of the device complies with the
requirements of these technical specifications, provided that the user observes the
conditions and rules of storage, transport and operation.
The warranty period of operation and storage of the device is 2 years from the date of
manufacture.
During the warranty period, the manufacturer guarantees the replacement of a device
that has failed.
Replacement by the manufacturer is not guaranteed if the device fails as a result of
mechanical damage or failure to observe the restrictions imposed on its operation.
9. Complaints
Developer / Manufacturer:
Diagnostika na Domu Limited Liability Partnership (ТОО «Диагностика на
Дому»)
Building 7/9, non-residential premises 174, Yegizbayev Street, Bostandyk District,
Almaty, 050046, Republic of Kazakhstan
Authorised representative of the manufacturer in the Russian Federation:
Diagnostika na Domu Limited Liability Company (ООО «ДнД»)
Domovladenie 2, building 4, Belyakova Street, Lianozovo municipal district,
Moscow, 127253, Russian Federation
Tel.: +7 (495) 369 38 94
Email: info@mydnd.ru
29

Page text
10. Applicable standards
TU 7500 RK 11739547 TOO-001-2023; GOST 14254-2015; GOST 15150-69;
GOST 14192-96; GOST 9142-2014; GOST R 50444-2020; GOST R IEC 60601-1-
2010; GOST R IEC 60601-1-6-2014; GOST IEC 62304-2022; GOST R IEC
62366-1-2023; GOST R ISO 15223-1-2023; GOST R IEC 60601-1-2-2014; GOST
10993 series.
30
